

Hide detail section lines using a script
You hide specific detail lines when you print a report.
You do this in a script by specifying whether lines of the Detail section should be displayed or hidden in certain circumstances.
Example for articles with stock
An article list should only include articles for which the stock is below the minimum stock. The report should only include articles that are eligible for stock replenishment, but you can set a filter for this.
The Detail section of the report includes the article code, article description, minimum stock and current stock fields.
You add the following script to the Create layout event of the Detail section:
If DecComp({Op voorraad},{Minimum voorraad}) = -1 Then
{Sectie:Detailsectie}.Visible = True
Else
{Sectie:Detailsectie}.Visible = False
End If
Explanation:
The DecComp (number A, number B) function compares two decimal fields. If number A is smaller than number B, the comparison results in the value -1.
Note:
- The script is applied to the Detail section line by line. That means that for each field to be printed you do not have to specify in the detail line whether it is visible.
- You cannot use a background colour for the even lines. This is because the count of the lines in the detail section may be incorrect because of the lines that are not visible.
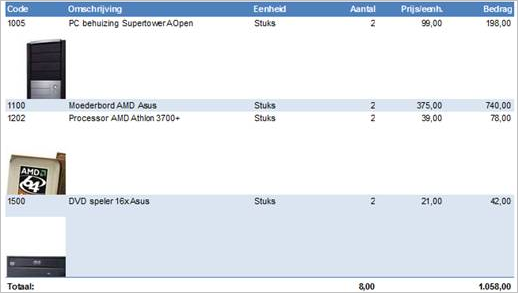
Example of showing detail lines without an image
If you generate a report that has images of sales items and no image is available for one of the items, you can suppress the space reserved for the image. The below sample report shows that the space for article code 1100 has been dropped.
We use the Sales order report as an example. There are two ways you can accomplish this:
Scripting in the detail section:
- Click on: the ‘Script - Events’ button.
- Go to: 'Remarks / Detail section / Create layout'.
- Add the following script (assuming the the image field name is ‘Small image’):
If Not IsEmpty({Small image}) Then
{Element:Image}.Visible = True
Else
{Element:Image}.Visible = False
End If
Script explanation:
- Not IsEmpty means ‘is not empty’. So the script checks whether an image is present. If an image is present, the report element must be visible, otherwise the report element should not be visible.
- {Small image} is the field from the data collection.
- Element:Image} is the image that will be printed (this is the image 'dragged' to the detail section, which will actually be printed).
Using a sub-report:
You can also use a sub-report to print an image.
- Add a sub-report based on the 'Items (Report)' data collection. In the data collection, add the Item type, Item code and Small image fields.
- Filter the data collection on the ‘Small image’ fields that are not empty. The result is that only the items in the data collection with an image are displayed.

- Filter the data collection on the ‘Small image’ fields that are not empty. The result is that only the items in the data collection with an image are displayed.
- Link the sub-report using the Item type and Item code fields.

- Add the image to the detail section of the sub-report.
Now the sub-report is only printed for items that have a linked image. For items that do not have a linked image, the sub-report will not be printed.
|
Directly to
|