

Verify and approve stocktaking
Once you have counted the stock in the warehouse/at the location, you enter the quantities or the differences found in Profit. Completing a stocktaking line is known as verifying. After you have verified the lines, you can approve them.
When verifying a stocktaking line, enter the date and the time stocktaking was conducted and the quantity or the difference found. Profit then checks whether stock entries took place between the time the stocktaking list was created and the time that stock was counted. Profit then determines whether there is a stock difference.
If a stock difference was identified, an entry for the stock difference is entered during approval. The corresponding journal entry for the stock difference is entered in the relevant journal in Profit Financieel.
You can have different users conduct the verification and approval of stocktaking lines (segregation of duties). You can also have a single user conduct these tasks, but then this user must be authorised for the Approve lines action in the entry layout.
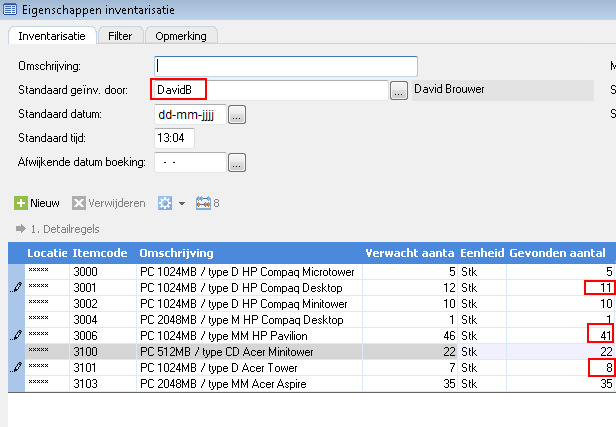
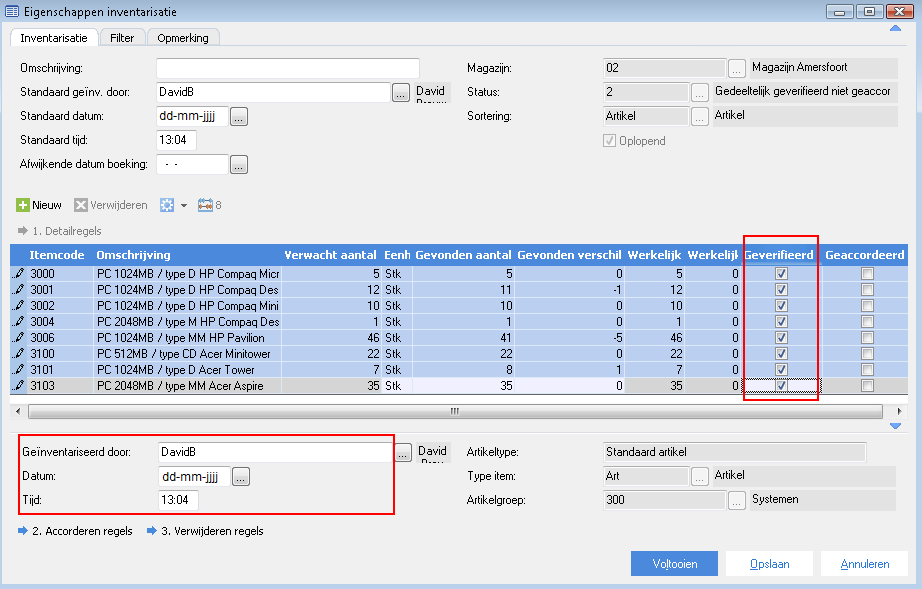
For standard articles you can change, verify and approve the quantities in the lines in the main window. For lot and serial number articles you can only change the quantities in the detail lines, not in the main line. You verify lot and serial number articles on the main line by selecting the Verified field, but you can also verify per lot or serial number by selecting the appropriate main line and then clicking on the Detail lines action. You can approve the verified lines by clicking on Approve lines at the bottom of the main window.
If you have specified a Deviating stocktaking time, the actual difference from the entries is calculated when you open the stocktaking. Only when the entered deviating stocktaking time has passed, can you approve the stocktaking.
To verify stocktaking:
- Go to: Order Management / Stock / Stocktaking.
- Open the stocktaking properties.
The entry layout for the stocktaking list is displayed.
- In the Stock taken by field in the footer of the entry layout, select the user who took stock of the line.
- In the Date field in the footer of the entry layout, enter the date on which stock was taken of the line.
- In the Time field in the footer of the entry layout, enter the time when stock was taken of the line.
Note:
If you do NOT complete the Stock taken by, Date and Time fields in the entry layout footer, then by default the values will be copied from the Default inventoried by, Default date and Default time fields in the entry layout header.
These fields in the entry layout header are filled with the user who conducted the stocktaking and the date and time on which the stocktaking list was added.
- Per line, enter the quantity in stock found in Quantity found. This is the actual quantity of articles in stock that is determined during stocktaking. If you have only recorded differences, you can enter the actual differences in the Difference found field.
In the case of a serial number, party number or article with article dimensions, you change the number in the subwindow.
- Click the serial number, party or article dimension article.
- Complete the footer fields.
- Click on the action: Detail lines.
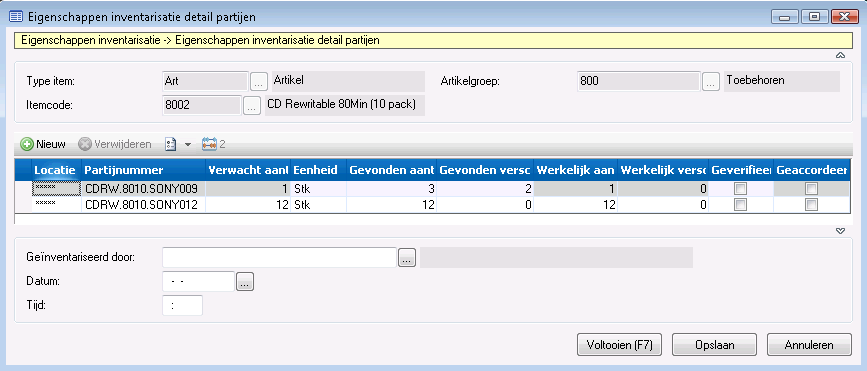
- Change the number in Quantity found.
- Click on: Finish.
Profit uses the Actual quantity and Actual difference fields to process interim increases and decreases and other stock entries. So this pertains to the actual quantity at the time of approval. For instance, if you purchased articles while stock was being taken, this quantity will be less than the expected quantity. During approval, Profit looks at when the run was created and approved and then includes all interim entries.
- Select the Verified check box at the end of the line to indicate that the stocktaking line has been completed. Click 'Yes' if you are prompted to set the underlying lines to Verified for assembled items.
- Repeat this for all lines.
- Click on: Finish.
You can save the changes at any time by clicking on Save. This way you save any changes without closing the entry layout.
To approve the stocktaking list:
After you have entered all the quantities/differences and have verified the lines, you approve the lines. This lets you specify that the verified lines are approved and that the entries for possible detected stock differences should be entered by Profit.
To approve the stocktaking list:
- Go to: Order Management / Stock / Stocktaking.
- Select the relevant stocktaking list.
- Click on: Properties.
- Click on the action: Approve lines, at the bottom of the entry layout.
- Click "Yes" if prompted whether to process the verified lines in the stock. Once you have done this, you cannot make any more changes to the quantities in the stocktaking lines.
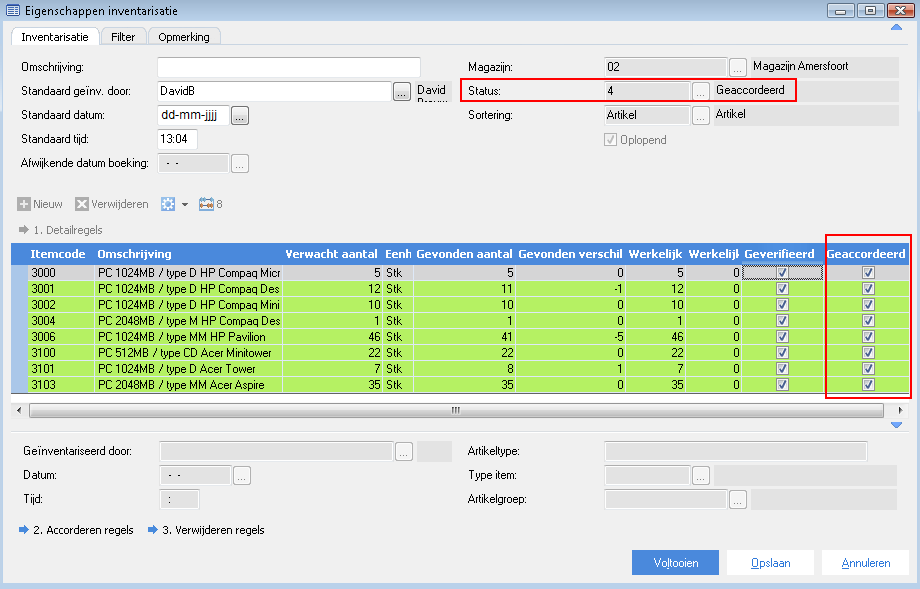
All lines now receive the Approved status.
- Click on: Finish.
As you can see, the stocktaking line as a total also has received the Approved status.
|
Directly to |