

Link an employee to a user
If you add an employee, you automatically create a person in CRM. It often happens that a user already exists for this person in the authorisation tool.
For the functioning of workflows, it is imperative that this employee is linked to the user. If this is not the case, the following message appears if you continue with a workflow: No user is linked to the follow-up task.
Example:
Jan van den Berg starts employment as a new employee.
- The P & O employee adds him as an employee as a result of which he is also added as a person in CRM.
- The application administrator adds Jan van den Berg as a user which means that he is once again added as a person.
You now need to merge these two people into one person with a link to an Employee and a User.
To link an employee to a user:
- Go to: HR / Employee / Employee.
- Open the properties of the employee.
- Go to: Actions (F8) / Person.
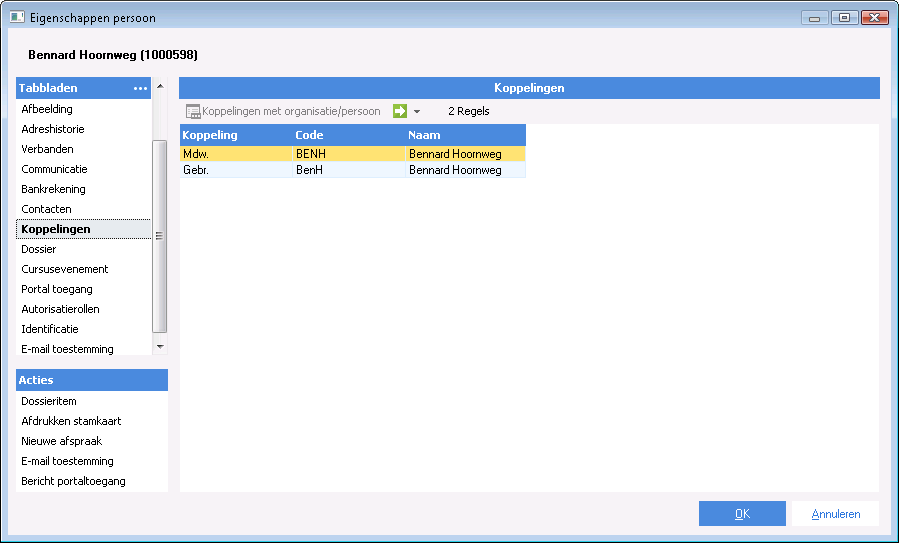
You now open the properties of the person. At the top of the window you see the name and the number.
- Go to the tab: Links.
On this tab you see that this person is linked to an employee. Here you should also see a link to user.
In the image below you can see that the person is properly linked:
- Click on: OK.
- Go to: CRM / Organisation/person / Organisation/person.
- Filter on (part of) the name of the person.
The result is that you now see two people with the same name but with different codes. You now have to merge the two. For the merge, the target is leading if the same data (e.g. name and work phone number) have been entered in both the source and the target. All underlying data and links will be transferred to the target if they do not exist in the target yet.
To merge:
- Go to: CRM / Organisation/person / Merge.
- Click on: New.
- Select the source.
- Select the target.
- Select the merge method:
- D: Direct merge: if you want to merge one source and one target then it is best to select this option.
- L: Add to list, merge later: select this if you want to merge large quantities of data. You can then run the action in the evening. If you select this option, you select the lines to merge when you are ready to start merging and then click on the Merge action. The organisations and persons are then merged.
- Click on: Finish.
If you selected 'Direct merge' just now, the source and the target are now merged. If errors are detected, a message is displayed. Resolve the errors and start the 'Merge' again.
If you selected the 'Add to list, merge later' check box, you now see a new line in the view that shows the selected source and target.
- Click on: New.
You can now add more lines.
- Select the lines.
- Click on the action: Merge.
A message is displayed. If you selected a lot of lines, the merge may take some time.
- Click on: OK.
The data is now merged.
See also
|
Directly to |