

Change an article group for the integration of Order management and Financial
If you activate specific functionality at a later date, you may be required to specify additional settings in the article groups to ensure that Profit journalises the transactions in the correct ledger account. For example, for reconciliation, assembly, disposal fee or advance payment. You have to configure the ledger accounts in Profit Financial before you can use them in the article group.
Per article group, you can link ledger accounts, view the articles and assembled items that are in the group and specify the minimum and maximum margins that apply.
To change an article group for Order management:
- Go to: Order Management / Item / Grouping / Article group.
- Open the properties of the article group..
- Go to the tab: General.
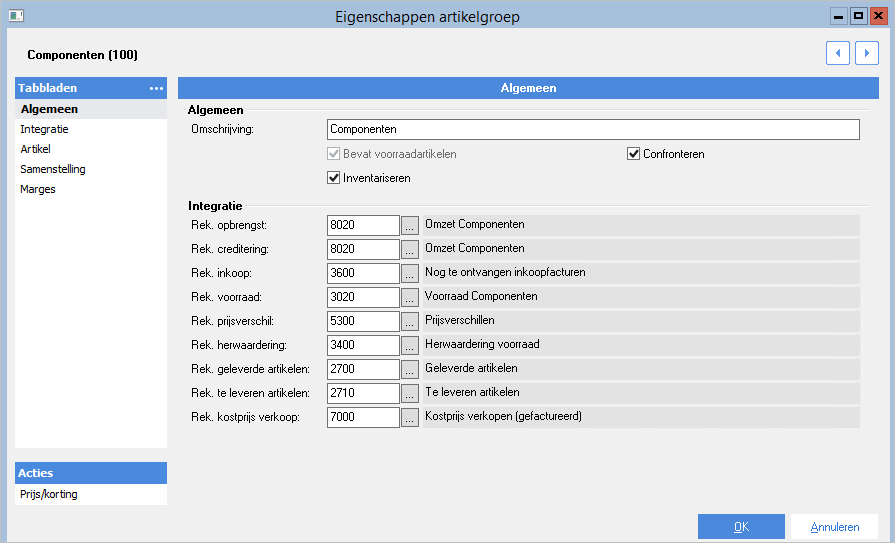
Under the 'Integration' header you see that for every type of cash flow Ledger accounts from Profit Financieel are linked.
The ledger accounts that you can and/or must link depend on the activations.
- Revenue account - You enter the turnover on this account. You can only select a ledger account for which the Allow VAT check box on the Preferences tab is selected. Consult Journalise sales invoice and Sales journal entries.
- Credit entry acc. - Consult Journalise a sales invoice.
- Account stock - Consult the examples for Purchase journal entries, Sales journal entries, etc.
- Purchase acc. - for purchasing. Consult the examples for Purchase journal entries and Transport costs.
- Acc. price difference - for purchasing. Consult the examples for Purchase journal entries.
- Account revaluation - A revaluation of the stock occurs when you change the transfer price. You can add a new transfer price manually but you can also recalculate the transfer prices based on a specific calculation method using a collective change of prices. Consult Calculate the cost price and transfer price and the example of the journal entry.
- Delivered articles acc. en Articles to be delivered acc.
Between the creation of an invoice and the actual delivery there is a period of time. To identify clearly that an invoice has not yet been processed although there has been a delivery and vice versa, Profit places these entries on a suspense account. For articles that have been delivered but for which the invoice has not yet been received (the default order processing method), you set the Delivered articles acc. account. For articles that have not yet been delivered but for which an invoice has already been received (for example, in the case of an advance payment), you use the Articles to be delivered acc. account.
- Sales cost price acc.
- Go to the tab: Integration.

Which ledger accounts you can and/or have to link depends on the functionality that you have configured:
- Enter account stock. Here, you select the ledger account that you want to use to enter the stock value if you add a manual stock entry. Thus, you can use a different ledger account than the Stock account used for the entry made for the addition of a goods receipt.
- Account stock difference for, amongst other things, the stocktaking.
- Reconciliation difference acc. for the Reconciliation activation. Consult the example of purchase journal entries.
- Acc. packaging for the Wrapping/packaging/disposal fee activation. Consult Integration with Financial for returnable packaging and the examples of returnable packaging journal entries
- Disposal fee account for the Wrapping/packaging/disposal fee activation. Consult Disposal fee
- Acc. production and Acc. production usage for the Production activation. Consult the examples of assembly journal entries.
- Transport cost acc. - Consult the example of a journal entry for transport costs
- Loss account - Consult the example of a journal entry for transport costs
- Go to the tab: Integration VAT duty.
This tab is only visible if you have enabled splitting per VAT duty in the Order management settings.
- Select the ledger account for the distribution of the revenue per VAT duty (for example, so that you can compare domestic revenue with revenue from abroad).
- Go to the tab: Article.
Here, you see all articles that are in the article group.
- Click on: New to add an article.
- Click on an article to view its properties.
- Go to the tab: Assembled item.
Here, you see the assembled items that are in the article group.
You cannot change anything here. You can add and view assembled items via the menu.
- Go to the tab: Margins.
Here, you see the maximum discount percentages that can be granted and the minimum margin percentages that must be reached for all articles and assembled items in this article group.
- Enter a value in the fields.
- Click on the action: Price/discount if you want to add or change a discount for all articles and assembled items within this article group. If the discount exceeds the maximum discount percentage on the Margins tab, a message appears.
- Click on: OK.
|
Directly to
|