

Group images in a carousel
You can group the different images on a page in a carousel. This carousel is a simple version of the carousel banner. You have a lot more options with the banner. This presentation style is not as useful for views, however, it is useful for a custom layout or analyses.
This may look as follows:

Note:
The images you want to group must be present on the page. If this is not (yet) the case, you first add the images to the page and then you create the grouping.
To group in a carousel:
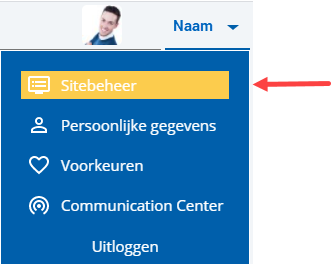
 Log on and start Site management.
- Open the page whose parts you want to group.
- Click on: Edit (in the Page frame).
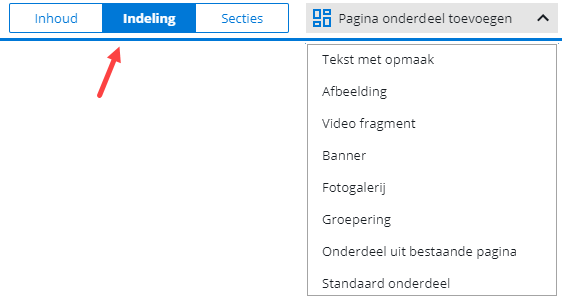
- Click on: Layout in the Display frame.
- Click on: New.
- Select Grouping.
- If applicable, enter a title.
- Select the Show component frame and title check box if you want to display this data.
- If you select this check box, a line is displayed around the grouping and the title of the grouping is displayed.
- Select the presentation style Carousel.
- Select the Animation check box if you want to have a nice transition when switching between tabs.
- Select the Allow part change using next/previous check box if a visitor can select the next and the previous images by using the buttons.
- Select the Show bullets check box if you want to display a button that enables visitors to select the previous and next images.
- Determine the interval in milliseconds.
This allows you to specify the time interval between the switching of the parts in the carousel.
- Select the Carousel button style for the previous and next button.
- If necessary, specify the height of the grouping.
If you do not want the grouping to be positioned close to the text, enter the Margins.
- Click on: Create.
An empty grouping has been added to the page.
- Double-click on the grouping.
- Drag the images onto the grouping.
- If necessary, customise the alignment of the images.
- Go to the tab: Parts.
- Select the part.
- Go to the tab: Properties.
- Select the desired value for Horizontal alignment.
- Click on: Modify.
- Repeat this for all images.
- Close the menu.
- Click on: Publish.
- Click on Yes in the message.
|
Directly to |