

To add an import definition and import a file
This is the default procedure for adding an import definition and importing the data from an import file.
If you have a file with data you want to import but you do not yet have an import definition for the file, you can add the import definition and import the data at the same time.
Note:
Always test the import in a test environment before making permanent changes to your live environment.
To add an import definition and import a file:
- Go to: the import function.
- Select Import through a new to be created definition.
- Click on: Next.
- Depending on the import function, an extra step may appear with settings, which specifically apply to the data to be imported. Configure all the settings.
- Click on: Next.
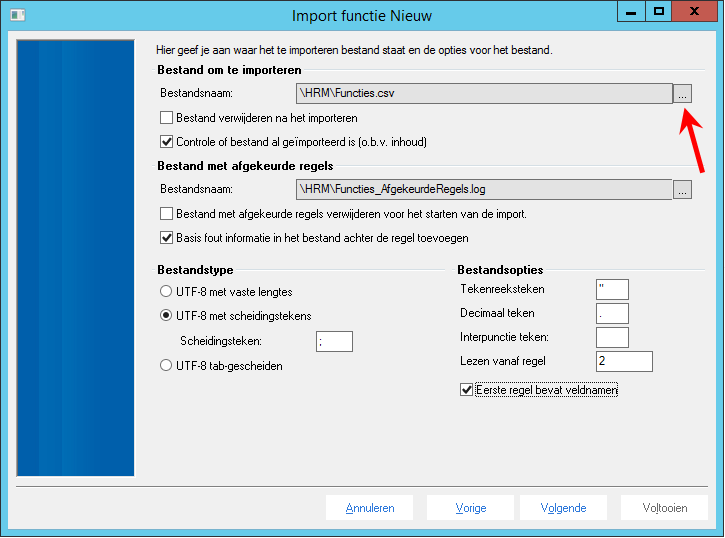
- Enter the file options (depending on the selected action).
- Enter the file to be imported (including the file location) into File to be imported.
- You can select the Delete file after importing check box.
If you are using AFAS Online, you must take into account the rules for recording a file location in AFAS Online.
- Always enter a name into File with rejected lines. All the lines that could not be imported are moved into this file.
- You can delete old log files by selecting the Delete file with rejected lines before starting the import. check box.
- Select the Add basic error information in the file following the line check box if a description of the error is to be added behind each rejected line.
- Select the File type of the file to be imported:
- ASCII file with fixed lengths
A fixed length is used for all the fields in a certain column. See also: Specify separations between fields in an import file.
- ASCII file with separators
The field values are separated by a particular separator, such as a comma or a semicolon. Enter the separator.
- ASCII Tab-separated
Field values are separated by tabs.
- ASCII file with fixed lengths
- Set the file options:
- Select the First line contains fieldnames check box if the first line of the ASCII file contains the field names. The other fields are then automatically completed correctly. As a result, a 2 is automatically entered into the Read from line field.
- In String character you can enter the character used in the ASCII file to indicate text fields (only for files with separators or tabs). Typically, single or double quotes are used for this.
- In Decimal sign you can enter the character used in the file as a decimal separator (usually a period or a comma).
- In Read from line, enter the first line number with data to be imported. If, for example, the first line contains field names, you should probably start importing at line 2. If you enter the value 2, the data is imported starting at line 2 and the field names on line 1 are ignored.
- Click on: Next.
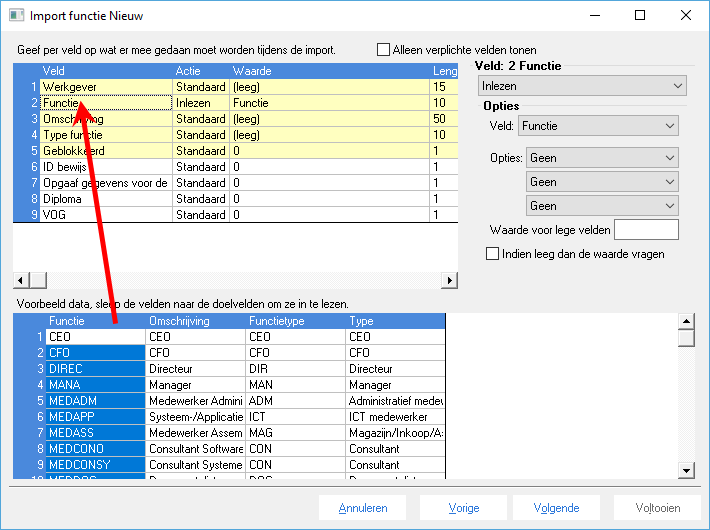
You can now see the fields to be imported. For each field you can indicate how it is to be handled during the import.
The fields to be imported are displayed in the bottom part of the window. The top-left part of the window shows all fields in Profit that can be imported.
- Select the Only show mandatory fields check box if you want a list only containing the mandatory fields.
Note:
You must at least import the fields that are mandatory into Profit. These fields have a yellow background.
- Link the fields from the import file to the Profit fields:
- Place the mouse on the column header of a field to be imported in the bottom part of the window.
- Drag the field to a Profit field in the top part of the window.
If the link was successful, the Read value is displayed in the Action column for the Profit field. The name of the field to be imported is located in the Value column.
- The Options (top-right) provide extra options:
- You can import a fixed value instead of a linked field.
- You can edit a linked field while you import.
- Click on: Next.
- You can add operations in Visual Basic.
- Click on: Next.
- Enter a description for the import definition and record the settings.
- Click on: Next.
- Display the overview of the import definition and carry out the check, if required.
- Check the import and correct any errors found.
|
Directly to |