

Add a task to a workflow
You add a For info task if you want to notify the task users when the dossier item reaches a certain point in the workflow. You can indicate that you want to send an e-mail message when the dossier item gets to this task. You can add multiple For info tasks to an action. This allows you, for example, to send a message to the employees in InSite and, in the same action, to send another message to customers in OutSite. You add a To be dealt with task when a task needs to be completed and which then gets a follow-up task. For a 'For info task', all users getting the task must complete the task themselves. For a 'To complete' task, one user completes the task after which the task is no longer displayed for any of the users.
You link the correct task to the action. You cannot change the task type afterwards, because both tasks have their own behaviour and properties. If you did link the wrong type, you delete the incorrect task and add the correct task.
If you add a task to the workflow, the workflow activities have to be determined again because the destination changes. This is done automatically. Please refer to the configuration of this process.
Example:
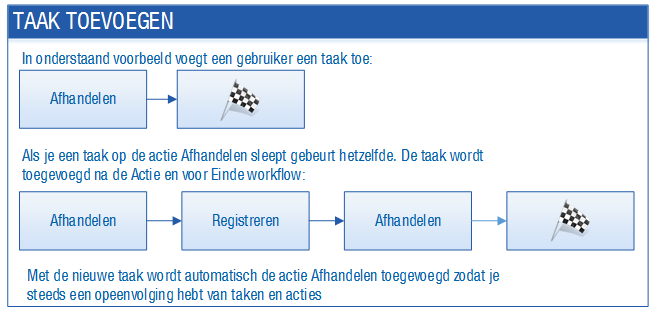
To add a task to a workflow:
- Open Profit.
- Go to: CRM / Dossier / Configuration / Dossier item type.
- Open the properties of the dossier item type..
- Go to the tab: Workflows.
- Open the properties of the workflow..
- Select the action to which you want to add a task.
You can insert a task between existing tasks.
- Double-click on the To be dealt with or For info task.
You can also select the task and then drag it to the action with the mouse.
- Select the task.
- At the right, in the Properties frame, you see the data regarding the status, options and any linked messages of the workflow. You can change this data. For example, you can add icons, place the action in a category and specify if a response is mandatory.
- Enter the description.
- Enter an extended description in Comment to clarify the task for the user.
The comment you enter, appears on a separate page part in InSite so the user can view the comment.
- Click on:
 after Task intended for.
When you publish the workflow, the task should have at least one destination. If that is not the case, a message appears notifying you that the Addressed to field has not been completed for task {}.
- Select the Show in task list check box, so the task is also visible in the task list of the user in InSite.
- Click on: Save.
- Click on: Publish.