Add a table of contents
You can add a table of contents to a page so that a visitor can quickly find the desired information.
Displaying the table of contents in a table lets you use the formatting options of a table.
To add a table of contents:
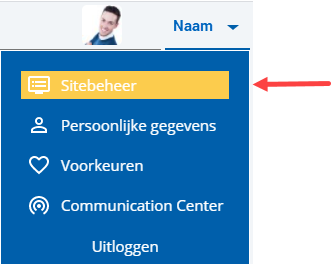
 Log on and start Site management.
- Click on: Edit (in the Page frame).
- Right-click on the position where you want to add the table of contents.
- Click on:
 (Table).
 - You can enter a name, for example Table of Contents.
The table of contents consists of one row and one column.
- Enter a value in Rows.
- Enter a value in Columns.
- Enter a value in Border width.
- Indicate how you want to align the text.
- Click on: Modify.
- Right-click on the added cell.
- Click on: CEL.
- Click on: Cell properties.
- Enter a value in Width.
- Enter a value in Height.
- Select Yes for Automatic word wrap if you want the text to jump to the next line at the end of the cell.
- If applicable, select a value for Vertical alignment.
- Click on: Modify.
- Click in the table.
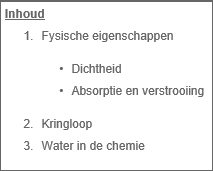
For example, you can add a numbered list.
More information:
Table of contents - detailed example - Click on:

- Enter the texts for the table of contents.
If you want to subdivide a topic still further into subtopics, you can indent the text.
In this case, you insert a Numbered list under the numbered list. In the list, click
 .
. - Click on: Publish.