

Import contacts
You can import all new organisations and the associated contact persons in one go. Contact persons are persons linked to one or more organisations and therefore you import them when you import organisations. To do so, you use the Organisaties Nieuw or the Organisaties Nieuw/Mutaties import. You can import new or existing contact persons. You cannot import contacts of the Department type.
Note:
First try the import in a test environment.
Because you are using the organisation import with which persons and contacts are also imported, it is possible that some fields are mandatory that are not directly related to the type to be imported. The mandatory fields have a yellow background. For example, this import contains:
- Fields for organisation
- Fields for persons are designated in the import with (Person).
- Fields for contact persons are designated in the import with (Contact).
You add the contact person directly to an existing or new organisation. That explains why one ore more organisation related fields are mandatory. The address fields are also always mandatory.
During the import, you check if an organisation already exists. The field you use for this check should be as unique as possible. Name and Address are often not unique enough leading to a notification that an organisation already exists while this is not the case. It also happens that the names of two organisations are different while they actually refer to the same organisation. For example, this occurs when the database has the full name and the delivered file has an abbreviation. It is therefore better to check using the Chamber of Commerce number because this is unique.
Example:
You have bought an address file in order to send a mailing to new prospects. You want to import this address file. The file contains organisations and contact persons. You only want to import the new organisations and new contact persons at existing organisations, and link existing persons to organisations. The precise data delivered is: organisation name, contact person, contact person job, contact person gender, organisation address.
To import new contact persons and new organisations:
- Go to: CRM / Management / Import / Organisation new/change.
- Specify whether you want to perform the import using an existing definition or a new definition.
- Click on: Next.
You will now see a window with import options.
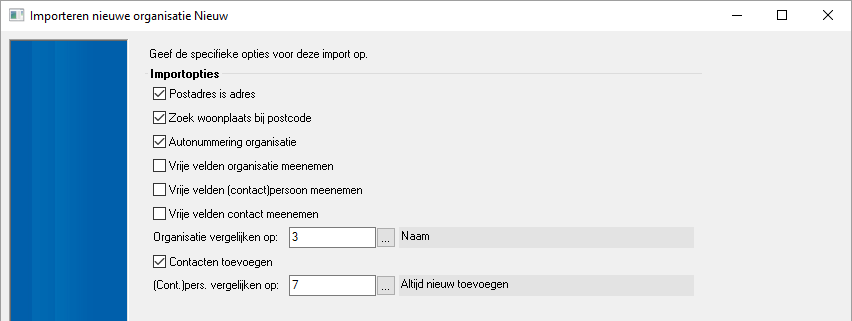
- Select the Postal address is address check box if the import file has only one address per organisation.
- Select the Find city for postal code check box to disregard the City field in the import file and to find the correct city based on the postal code. This ensures a consistent spelling of the city names in your database. If you do not use this option, the same city can appear under different names in the database (for example, Den Haag, 's Gravehage and 's Gravenhage).
- In Compare organisation on, select the field in the import file that you want to use to check if the organisation already exists. The field you select, becomes mandatory for the import.
- Select the Add contacts check box.
- In Compare (Cont.)pers. on, select the field in the import file that you want to use to check if the person already exists, Name + gender. If the person does exist, he will be added to the organisation as a contact. If the person does not exist, he will be added as a person and added to the organisation as a contact person.
- Click on: Next.
In this window, you enter the properties of the import file.
- The File type depends on the layout of the import file. If you do not select the correct type here, Profit will not be able to import the data from the file.
- In File options, you specify additional settings for the layout of the lines. For example, you can specify that character strings are between quotation marks, so that Profit handles them as one entity and places them as a whole in one field. If the first line of your import file contains field names (labels) then select the First line contains fieldnames check box.
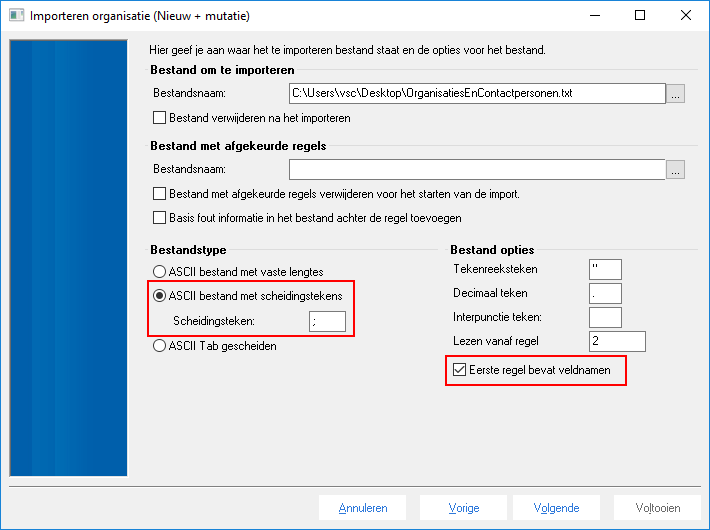
- Click repeatedly on: Next. (until you see the window with the fields):
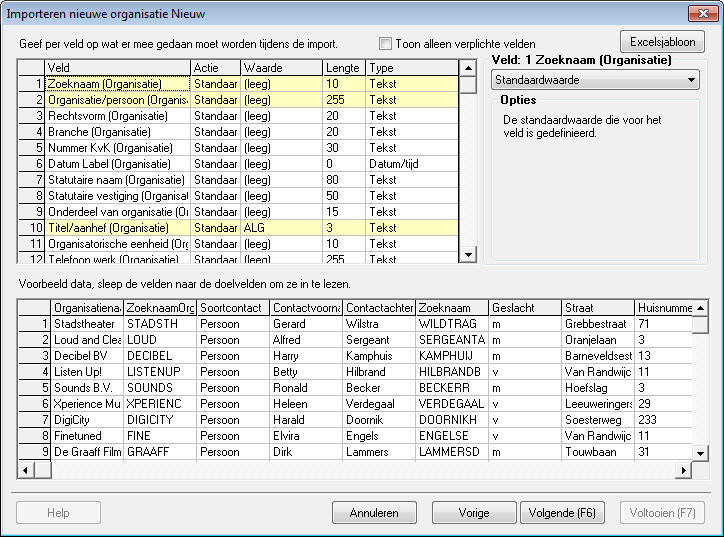
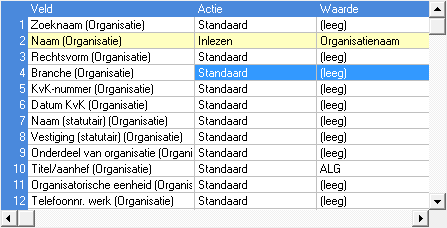
In this step you link the fields from the import file to the fields that are known in Profit:
- Fields displayed with a yellow background are mandatory. Link a field to a field in the import file, unless Profit enters a default value in the field (in this case the value 0 or Gen is entered in the Value column).
- Address fields for the organisation do not have a yellow background, but they are mandatory.
If you want to import addresses for contacts, you must also link the address fields for the contacts.
- Other fields are not mandatory, but if you do link them, you will not have to record the data manually later on.
- Link a field from the import file to a Profit field by dragging the import field to the Profit field and then releasing the mouse button.
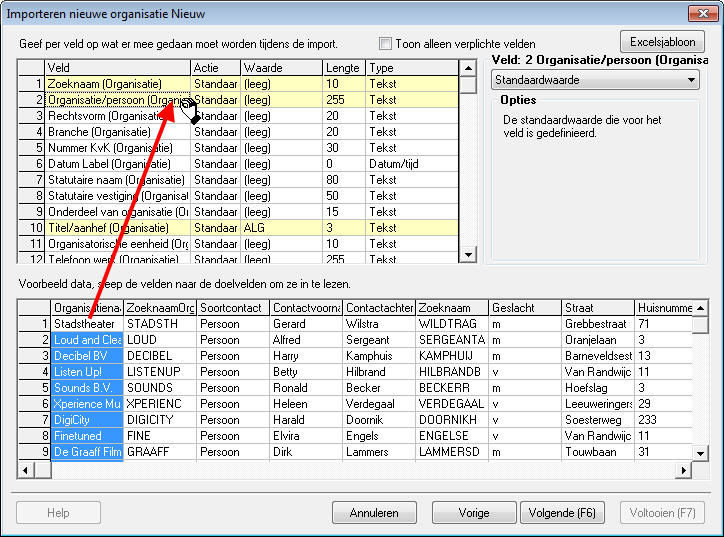
The (yellow) line with Name(Organisation) now contains the action Read because Profit will read the value for the field from the import file.
- Find the Country(Organisation address) field (it is further down). As you see, Profit enters a default value in this field. Because you are importing Dutch addresses, you specify that Profit automatically uses the value NL for each import line:
- Select the line with Country (Organisation address).
- Select Fixed value.
- Enter the value NL.

- Link the address fields:
- Street (Organisation address)
- House number (Organisation address)
- Postal code (Organisation address)
Which fields are mandatory depends on the Country settings.
- Link the fields for the person, for example
- LastName (Person)
- First name (Person)
- Search name (Person)
- Gender (Person)
- Find the Country (Person) field (it is farther down). In this field, specify the fixed value NL, just as you did forCountry(Organisation).
- Link the organisation address fields to the contact person as well. This way you import the same address for the organisation and the contact person.
Go all the way down in the field list and link the following fields:
- Street (Address contact)
- House number (Address contact)
- Postal code (Address contact)
- Click twice on Next.
- Enter the description. Profit saves the import definition using this name so you do not have to specify all the settings again the next time.
- Click on: Next.
Profit displays a summary of the import definition.
- Click on: Finish.
To simultaneously import a new person and a new dossier item:
In Profit, you have the option to import a new person and a new dossier item simultaneously (for example, from a website).
- Disable auto numbering for the person. This way you can specify a number for the new person to be created from the website. This is required to be able to save the dossier item later on.
- You generate a person number on the website from which you are importing the information.
- Using the connector, you add a person to this person number.
- Finally you import a dossier item using this (person) number.
|
Directly to |