

Add a domain (multiple application servers with local web servers on all of them)
The web domain is the address you use to make InSite available over the internet. You add the web domain to Profit. You link web server(s) to this web domain.
Example:
To further clarify the configuration, we will add the insite.enyoi.nl web domain. Enter your own data here. We also use the Windows user enyoi.nl\updateservice.
You specify a domain in (no more than) three steps:
- Add a domain
- Add a web server to a domain and set up the connection with the web server
- Add virtual paths
Note:
This feature is only available in the Central Logon Environment.
To add a domain:
- Go to: General / In & OutSite / Configuration / Domain.
- Click on: New.
- Enter a value in Domain name.
This is the web domain for which you have set up a certificate (in IIS) and on which InSite is available via the internet.
Note:
The link to the web domain must be the same as the link from the SSL certificate. If that is not the case, a message about a certificate error appears when the user tries to log on.
In this example this is insite.enyoi.nl.

- Enter the description.
- Select the InSite portal portal type.
- Select the Link domain directly to web server check box.
- Click on: Finish.
Now you can immediately link a (new) web server to the domain.

- Click on: New. (or select a web server that has already been added)

- In Server name, enter the name of the web server. The server name must be unique in the Windows domain.
Using the following steps, you can find the server name on the web server:
- Click on: the Windows Start button.
- Right-click on Computer.
- Open the properties.
You now see the server name.
- Enter a description so you can easily recognise the server in the view.
- In Type of web server, select the IIS version you use on the web server.
The IIS version depends on the operating system:
- Windows Server 2008: IIS7.0
- Windows Server 2008 R2 and Windows 7: IIS7.5
- Click on: Next.
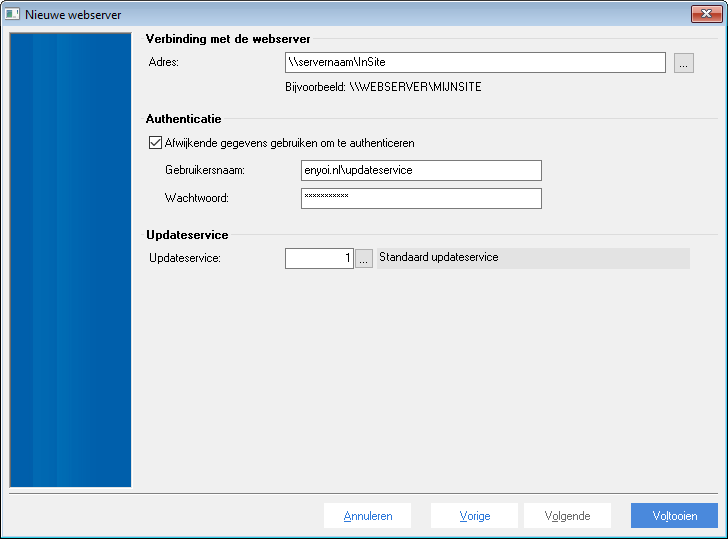
- Enter a value in Address.
Note:
The address is the location where the files of the site are placed. This is a //share or a direct location. If Profit is installed on only one web server, you enter a direct location.
If you are working with a separate application server, the files must be accessible on the web server through a share.
In Address, enter the share name where you want to publish the web files. This is a path that starts with '\\', for example: \\Servername\Webfiles.
You add a share in Windows. Grant a domain user at least change rights.
You can set up a user with the correct rights in the Profit Update Service. You select this user in the next step.
- Select the Use different data to authenticate check box.
Enter the username and the password of a user with sufficient rights.
- In Update service, select the value Default update service.
In our example this looks as follows:
- Click on: Finish.
You now return to the wizard.
- Click on: Finish.
You have now added the web domain and linked it to one of the web servers.
Now add the other web servers and link them to the web domain.
|
Directly to |