

Request more information from the applicant (workflow)
As soon as an applicant has applied, the application goes through the default Application workflow. The user identified in the vacancy as Responsible for vacancy can request information from the applicant. You let things proceed via the application portal as far as possible.
You can have the communication between you and the applicants proceed in two ways: only via e-mail or via e-mail and your response in the portal. If you make your request via e-mail and the applicant sends an e-mail back with additional data then, as HR employee, you still need to add the data yourself in Profit.
As HR employee, to avoid having to enter the information manually yourself, use the combination 'e-mail + response in the portal'. This not only sends an e-mail message, but you ensure that the applicant goes to the application portal to respond to the response that you have added.
In the workflow, the combination ‘e-mail + response in the portal' works as follows:
- Via an email (with the right, general text), you make the applicant aware of the request in the application portal. You add this yourself in a message template that you link to the action.
Example:
We would like to receive some additional information. Log on here to see what data we require and add the requested information.
- When performing the action, you use the response to say exactly what is still required. (A condition is that you have set up the response as 'Mandatory for InSite' in the workflow).
Example:
Dear John, Could you please add your CV? Preferably as a PDF file. Thank you.
- The applicant can then log on to the application portal and supply the data.
- After the applicant has added his data, the application returns to your task list and you can view the data.
To request more information from the applicant using a workflow:
- Go to: InSite.
- Go to: My InSite.
- Open the task in My tasks.
- Click on: Verzoek om extra informatie if you need more information.
The response has been made mandatory in the workflow action.
You now add a response that you also want to display to the applicant externally on the portal:
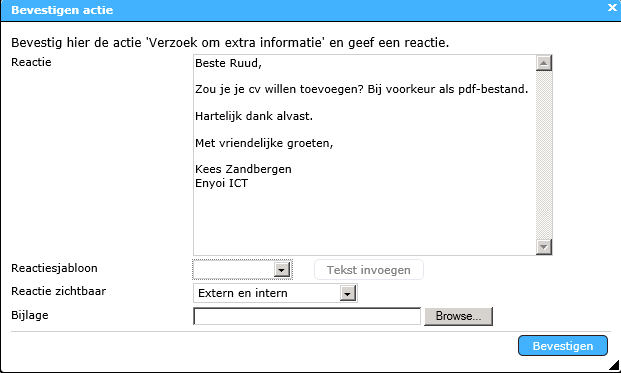
- Enter the response.
- Select External and internal for Response visible.
This makes the response visible in the application portal in OutSite and in InSite.
Note:
If you do not want the response (and, with that, the complete dossier item) to be visible internally in InSite to the applying employee, you must change the authorisation for the dossier item type Sollicitatie.
- Click on: Confirm.
Via the workflow, the applicant now receives an e-mail message with the request to log on to the application portal (if you have mentioned this in the text in the message template linked to the workflow action). This e-mail message is based on the Workflow action message template.
You must link the message template in the action and set that the message is sent when the action is started directed towards the users of the task (portal users).
The applicant can view this response in the application portal and add the data.
As soon as the applicant has added the information as a response, the task is placed in your task list in InSite as a dossier item.
To view the added information:
- Go to: InSite.
- Go to: My InSite.
- Open the task in My tasks. The task still has the Review applicant status.
- Open the new response with the requested information.
- Perform one of the following actions:
|
Directly to
|