

Display a custom contact file in InSite
You can display a custom contact file as an overview in InSite. You can make the custom contact file visible in InSite at the contact, employee, organisation, person, purchase contact and sales contact levels. In this overview in InSite, you cannot change the data of the custom contact file.
Make a custom contact file visible in InSite (in Profit)
When you activate the custom contact file, you can set it to be visible in InSite as well..
To make a custom contact file visible in InSite:
- Go to: General / Environment / Management / Properties.
- Go to the tab: Custom contact files.
- Open the properties of the custom contact file.
- Select the Visible in InSite check box under the InSite header.
- Enter a value in Plural description.
Profit uses this description for the name of the page type that you activate for the site.
- Go to the tab: Visible with.
You now see a list of all possible master files.
- Select the destinations where the custom contact file should be visible.
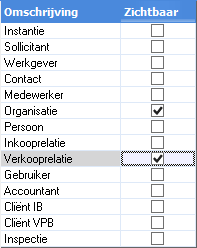
If you select Organisation and Sales contact, you can record the Relatiegeschenken custom contact file at the organisation and sales contact levels.
You can only make the custom contact file visible in InSite at the contact, employee, organisation, person, purchase contact and sales contact levels.
- Click on: OK.
Profit adds a page type for every custom contact file that you make visible in InSite.
See also:
Activate a page type for InSite (in Profit)
When you activate a custom contact file and make it visible in InSite, Profit automatically creates a page type. You activate this page type.
To activate a page type:
- Go to: General / In & OutSite / Site.
- Open the properties of the site.
- Go to the tab: Page types.
- Select the Activated check box behind the page type for the custom contact file.
The page type has the plural name that you specified when you activated the custom contact file and made it visible in InSite.
- Click on: OK.
Create an overview in InSite (in InSite)
A custom contact file is shown in InSite as an overview in the properties of, for example, an organisation. You cannot change the data in the overview. You display the overview as a page component (in the same way as you use a tab in Profit).
To create an overview in InSite:
- Open the site.
- Log on with the user name and password.
- Click on: OK.
- Click on the arrow behind your user name in the top right corner of the window.
- Click on: Site management.
- Go to: the location where you want to display the custom contact file.
For example, if you want to display the Relatiegeschenk custom contact file in the properties of an organisation, you go to: Relations / Organisations and open the properties of an organisation.
Your choice must match the destination you have selected in General / Environment / Management / Properties, on the Custom contact files tab, in the properties of the custom contact file.
- Click on: Edit.
- Click on: Layout (to add fields).
- Click on: New in Page parts.
- Select Onderdeel uit bestaande pagina (i.e. from the tab in Profit).
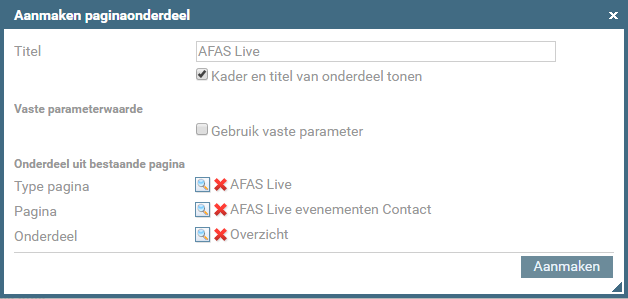
- Enter a value in Title.
- In Page type, select the page type activated for the custom contact file in Profit.
- In Page, select the custom contact file for this destination. In this example you select the file for organisations.
- Select the overview in Part. In this example the overview for organisations.
- Click on: Create.
Add fields to an InSite template (in Profit)
In Profit, you have added the fields of the custom contact file to a new tab. You now have to add these fields to the InSite page component.
To add fields to a template:
- Go to: Profit.
- Go to: General / InSite / Template.
- Open the properties of the template for the custom contact file, for example Relatiegeschenk.
- Go to the tab: Pages.
- Select the custom contact file whose fields you want to display. You can display different fields for each destination.
In this example you select Relatiegeschenken Organisatie.
- Click on the action: Adjust view.
- Enter a value in Description. The will be the name of the view. For example: Relatiegeschenk organisatie.
- Click on: Next.
- Add the fields to the InSite view.
- Click on: Finish.
- Click on: OK.
Test:
- Complete the field of the custom contact file for an organisation in Profit. If you are not authorised, set the authorisation.
- View the custom contact file in InSite.
See also:
|
Directly to
|