

Counters
You use counters to determine the last voucher number or the last invoice number. Add the counters and link the correct counter to each journal.
You also have a counter by employer for the numbering of employees based on an employer prefix. If you did not set up this numbering method in Profit HR, you cannot record a counter at the employer level.
Note:
In Profit Order management and Profit Projecten (i.e. also project invoices, instalment invoices, etc.), invoice numbers that do already exist are not assigned. When checking whether an invoice number already exists, the system also looks at the financial invoices, i.e. not just at the order management invoices, project invoices and instalment invoices. This check takes place across all administrations.
If you delete an invoice, then Profit will log the deleted invoice number. When an invoice number is deleted, your invoice numbers will no longer be consecutive, even though the Tax Authority requires this. If the invoice numbering does not meet this condition, then customers may not be entitled to the VAT deduction. You can view logged invoice numbers using the Deleted and cancelled invoices (Profit) report.
You can add a counter with one continuous range, a manual range or an automatic range.
To add a counter with automatic periodic ranges:
- Go to: General / Configuration / Numbering settings / Counters.
- Click on: New.
- Select the counter type in Counter set.
- Enter a description for the counter.
- Enter the total number of positions that must be used for the range in Total length.
The maximum length for the range is 12 positions. This includes the leader.
- Enter the leader using a year tag. This information is mandatory, as it allows Profit to automatically add new ranges every year.
The leader is always the same in a particular year; the rest of the number is automatically incremented by Profit.
Example:
You can use both Dutch and English tags in the leader part:
- For years, you can use the year tags: [YYYY], [YYY], [YY], [Y], which result in '2016', '016','16' or '6', respectively, as the leader of the counter.
- For administrations, use [AAAA] or [UUUU] as an administration tag. This results in the administration’s sequence number as the leader for the counter. You can use a maximum of four characters in the tag, for instance [AAAA], [AAA], [AA] or [A].
These tags work irrespective of which language setting is used in Profit. French tags are not available. If you have set the French language, use the Dutch or English tags.
You can also specify a year tag in combination with text, for example, INK[JJJJ] or V[JJJJ]. With this setting, Profit assigns the number INK201630001 to the first purchase invoice of 2016 and the number V2016001 to the first sales invoice.
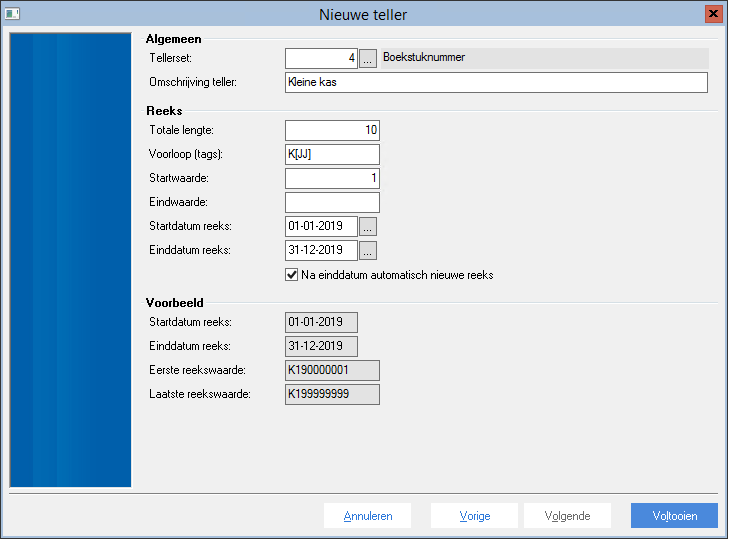
- In Start value, enter the first number of the number range you want to use. If necessary, the number will be padded with leading zeros. Whether the numbering is padded with zeros depends on the total length of the range.
Example:
If you enter 1 as the start value of the range, INK as leader and 8 as the total length, then the number will be INK00001. The number is therefore padded with four zeros. If you do not use a leader, then the number will be padded with seven zeros: 00000001.
- Check the sample start value of the range. You see it immediately in the current window alongside Start value.
- Only enter the End value if you want the range to stop when this end value is reached.
- Enter the Range start date and the Range end date, so that the range only begins on the start date and ends on the end date. The period between the counter’s start and end dates must be 365 or 366 days.
Example:
Enter 1 January as the start date and 31 December as the end date. After adding this range, Profit automatically adds the range for the next year with a start date of 1 January and an end date of 31 December.
If you are using broken financial years, you enter the start and end dates of the broken financial year. For example, enter 1 June as the start date and 31 May as the end date.
- Select the Automatically add new range after end date check box.
You must select this check box, so that Profit can automatically add new ranges each year.
- Click on: Finish.
After you have added a new counter, you must still link it to the correct journal.
Link the new counter to a journal.
- Go to: Financial / Ledger / Journal.
- Open the properties of a cash book.
- Select the new counter in the Last voucher counter field on the General tab.
- Click on: OK.
See also: