You can have a (custom) field for an action in the workflow populated automatically with a fixed value, a value from another field or a value from a tag. You can also choose to clear the field in the workflow.
Click here for an example of the use of custom fields for a destination.
Je kunt vrije velden opnemen in je workflowbestemmingen. Dit kunnen allerlei vrije velden zijn; bijvoorbeeld vrije velden gebaseerd op een "Bestandskoppeling", Gebruiker en Groepen. Deze vrije velden komen ook als "Bestemming" beschikbaar in je workflow.
Wat kan je er nu mee?
Hier een voorbeeld van enkele vrije velden bij de medewerker:
Deze velden zie je nu ook als bestemmingen in de workflow:
Hoe werkt het dan?
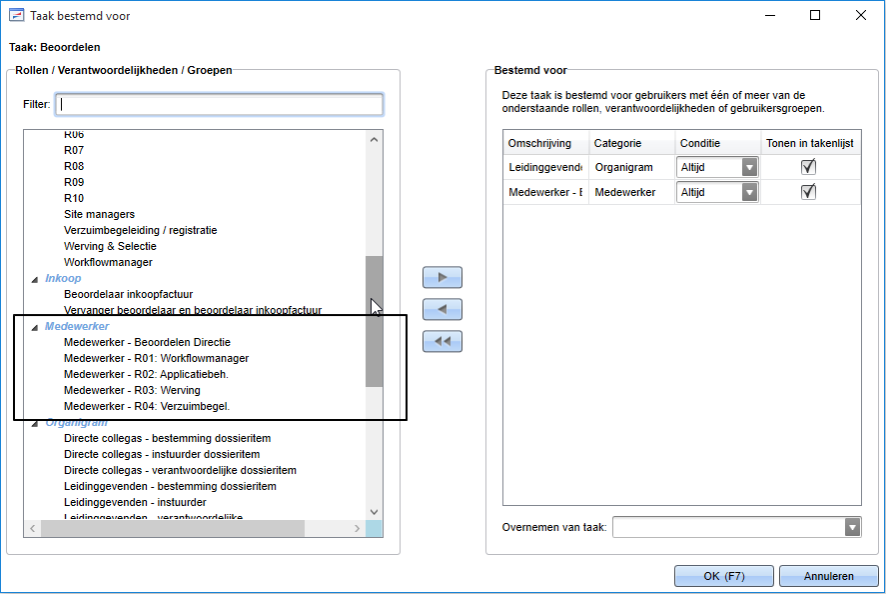
Als een medewerker geen leidinggevende heeft, naar wie gaan dan de mutaties, declaraties, verlofaanvragen...? Dit kan je oplosen door een vrij veld toe te voegen met een koppeling naar het bestand: User of Group. Deze noem je bijvoorbeeld "Beoordelen directie".
Bij de directie en/of andere medewerkers die geen "leidinggevende" hebben volgens het organigram, vul je een gebruiker of groep in (van degene die de aanvragen beoordeelt). Deze voeg je toe aan je bestemming in je workflows.
De aanvragen van de betreffende directie of andere medewerkers zonder leidinggevende komen dan bij die betreffende gebruiker of groep terecht.
Bij de overige medewerkers laat je dit veld leeg.
Example:
If one user always completes a certain action, you enter a Fixed value in the Resp. person field. The value is then the user who you selected from the list.
You can also enter a value in the Begindatum field. Here, you can select, for example, Value from tag. In that case, you enter the [Today] tag in the Waarde field.
In addition, you can have a field populated with the value from another field. Suppose that the sender is always responsible for the last action of the workflow. In that case, you can have the Resp. person field populated with Value from field Sender.
Note:
Restrictions apply to assigning a value to a custom field for destinations in HR/Payroll (such as Employee, Organisational unit, Employer, Car and Absence entry). You can only do this in workflows for your own dossier item types and in supplied workflows for the Wet Verbetering Poortwachter (Profit) dossier item type.
To assign a value to a field:
Open Profit.
Go to: CRM / Dossier / Configuration / Dossier item type.
Je kunt meerdere gegevensverzamelingen koppelen aan een workflow. De velden in de gegevensverzameling kun je vervolgens op meerdere plekken in de workflow gebruiken, zoals bij condities en verplichte velden. Je kunt alleen gegevensverzamelingen toevoegen die direct verband hebben met het dossieritem, bijvoorbeeld de gegevensverzamelingen van de bestemmingen.
Als jij bijvoorbeeld de gegevensverzameling Current details Employee en Employee/declaration entry koppelt aan de workflow dan loopt de workflow ook nog goed als een medewerker wijzigt van functie.
Note:
Het kan zijn dat je een conditie maakt die gebaseerd is op de gegevensverzameling van ‘Inkooprelatie’. Als je het dossieritem vervolgens instuurt met als bestemming ‘Werkgever’, is de waarde van de betreffende conditie altijd ‘FALSE’ (omdat de gegevensverzameling altijd een leeg resultaat/geen records zal opleveren).
Gegevensverzameling koppelen aan workflow:
Open Profit.
Go to: CRM / Dossier / Configuration / Dossier item type.
Open the properties of the dossier item type..
Go to the tab: Workflows.
Open the properties of the workflow..
Selecteer de eerste actie van de workflow.
Open het kader Workflow management.
Click on: New.
Je ziet nu een weergave met alle vrijgegeven gegevensverzamelingen. Als je al een gegevensverzameling hebt gekoppeld is deze niet meer zichtbaar in de lijst.
Op de gegevensverzamelingen is geen autorisatie toegepast.
Selecteer de gegevensverzameling die je wilt toevoegen.
Je kunt niet alle beschikbare koppelingen volgen. Zo kun je bijvoorbeeld niet via een medewerker naar een persoon gaan en daar dan velden ophaen. Je moet de velden van de persoon dan in de eigen gegevensverzameling opvragen.
Voeg de gewenste velden toe aan de gegevensverzameling.
Je kunt niet filteren in de gegevensverzameling. Het dossieritem bepaalt het filter op basis van de bestemming.
Click on: Finish.
Je kunt de velden uit de gegevensverzameling nu gebruiken in de andere functionaliteiten binnen de workflow. Ook als je de workflow nog niet publiceert.
Je kunt meteen nog een gegevensverzameling koppelen.
Wijzigen gegevensverzameling in workflow:
Een wijziging in de gegevensverzameling is definitief nadat je de wizard voltooit. Ook als je de workflow nog niet publiceert.
Open Profit.
Go to: CRM / Dossier / Configuration / Dossier item type.
Open de eigenschappen van het type dossieritem.
Go to the tab: Workflows.
Open de eigenschappen van de workflow.
Selecteer de eerste actie van de workflow.
Open het kader Workflow management.
Open de eigenschappen van de gegevensverzameling.
Voer de gewenste wijzigingen door.
Als je een veld verwijderd uit de gegevensverzameling wordt gecontroleerd of het veld gebruikt wordt in een gepubliceerde workflow. Als dit zo is krijg je een melding.
Als je een veld verwijderd uit een nieuwe workflow en dat veld wordt ook gebruikt in een conditie, kun je de wizard van de gegevensverzameling gewoon voltooien. Als je vervolgens de workflow publiceert krijg je een melding dat het publiceren niet mogelijk is omdat een conditie gebruik maakt van een veld dat niet meer voorkomt in de gegevensverzameling.
Click on: Finish.
Verwijderen gegevensverzameling uit workflow:
Als je een gegevensverzameling verwijdert wordt gecontroleerd of de velden uit de gegevensverzameling gebruikt worden bij een andere functionaliteit, bijvoorbeeld als verplicht veld.
Open Profit.
Go to: CRM / Dossier / Configuration / Dossier item type.
Open de eigenschappen van het type dossieritem.
Go to the tab: Workflows.
Open de eigenschappen van de workflow.
Selecteer de eerste actie van de workflow.
Open het kader Workflow management.
Selecteer de gegevensverzameling die je wilt verwijderen.
Click on: Delete.
Als velden uit de gegevensverzameling worden gebruikt krijg je een melding dat het verwijderen niet mogelijk is. Je ziet meteen in welke onderdelen van de workflow gebruik wordt gemaakt van de velden.
Open the Assign value frame.
Click on: .
Select the file from which you want to use a custom field.
You can only select a file in which custom fields are available.
Select the field to which you want to assign a value.
The fields that you can choose depend on the configuration of the dossier item type. You can add the same field more than once. If you are using conditions, you can have the field populated with different values, depending on the condition.
Select how you want to fill the field. You can choose from:
Fixed value
Value from tag: read here to see which tags are supported.
The value from field
Clear a field
If applicable, select the data collection.
If you have added two or more data collections to the workflow, you can populate a field with a value of a field in the data collection. You can only select fields from the data collection if you have selected Value from field in Fill with.
Select the value.
You can delete a submitted value using Delete. You can only select the 'Value' if you have selected a data collection or if you only specified one data collection for the workflow and selected 'Value from field' in 'Fill with'.
Note:
The result of populating a field may be that the field is cleared. This happens if a field is populated from another field that does not have a value (in that case. the field to be changed is cleared).
The workflow can only be used to change certain fields of the dossier item type and the custom fields of the dossier item type.
This does not include the fields of, for example, an employee. These fields cannot be changed by a workflow with the 'Assign value' functionality.


 here for an example of the use of custom fields for a destination.
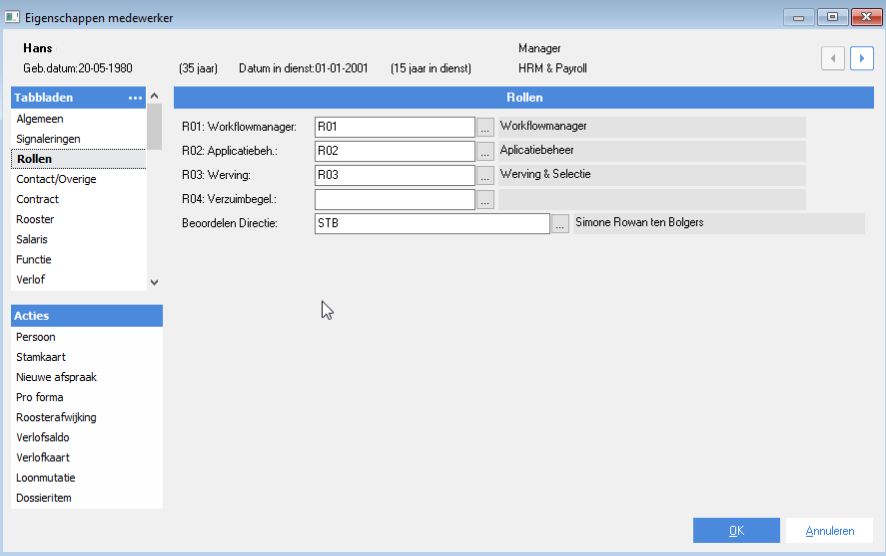
 .
.