

Set the email server and sender
Profit can generate and sent email messages. The email application (installed on your own PC) is not used within this context. In Profit you record various settings, including the email server to be used.
Guidelines for emailing in relation to AFAS Online
Recommendations to successfully sending email messages through Profit.
Email addresses of those addressed
- Ensure you have an email address file that is up-to-date and correct in Profit.
If a large number of email messages are sent to invalid addresses from AFAS Online, this may lead to the AFAS Online mail server getting a bad reputation. The AFAS Online mail servers may even be blocked because these invalid addresses are identified as being spam. Invalid/refused email messages therefore not only have an impact on the environment, but also on other AFAS Online environments. In addition, it is also important from customer centricity that customer data is correct.
- Examine refused email messages regularly and rectify incorrect addresses.
Your email address: sender@domain.nl
- Use an existing sender for email.
Send the emails from Profit on behalf of a valid domain (the section behind the @). You usually use a sender of the organisation for this such as @enyoi.nl. It is important that you are the owner of this email address/domain. If this is not the case, the first step is to register a domain name. We cannot support you in this. You must arrange this outside Profit.
An email address sender that does not exist is often rejected by the receiving party because it is deemed spam. A 'No-reply' address is a non-existing sender. If you want to use a no-reply address, at least ensure that the domain where the email comes from is valid.
An additional disadvantage of a no-reply address is that, as the name already infers, you cannot receive replies to the messages. This means that you will not see which emails have arrived at the addressed parties. This means that you are missing out on the opportunity of rectifying incorrect email addresses.
- Use a valid, existing domain
Valid means that a relationship can be demonstrated between the domain and the sending server. The mail server of the receiving party compares the domain of the email address using the sending AFAS Online mail server. If they do not seem to be related, this is referred to as 'sender spoofing'. The receiving mail server will not accept the email in this case. You can prevent this by changing the SPF record.
Where in Profit do I configure the sender of an email message?
In Profit, you can configure a sender for emails that you send from Profit at three levels.
- In the properties of the environment (General / Environment / Management / Properties Email tab).
- In the administration properties (General / Administration / Management / Properties Issue tab).
- Deviating sender per message template (General / Management / Message / Message template).
Profit looks from the bottom to the top within this context. This means that, if a deviating email address has not been configured in the message template, the sender of the administration will be used. Has a sender not been specified in the properties of the administration? Profit will then check the email address in the environment's properties. When manually sending a report from the Report generator, a message template is not used. Here, therefore the sender from the administration is used for this.
For sending payslips and other HRM-related messages, you can configure a sender in the employer's properties.
For alerts, AFAS Pocket activation mail, etc., we look at the email address that has been specified in the properties of the environment in the Sender automatic email field unless a sender has been specified in the message template.
Configure the AFAS Online mail server
You will be using the AFAS mail server. You must authorise the AFAS mail server to email on behalf of the sender's domain name. Next, you record the settings in Profit.
Profit will log all sent email messages including the return information of the recipient (such as a bounce status and a mailbox that cannot be reached). Use this function to actively monitor outgoing email and thus improve the communication.
Step 1: Authorise via the SPF record
You can authorise the AFAS Online mail server by adding the AFAS mail server to the SPF record of your own domain. You inform the receiving party with this that an email message that arrives through the AFAS Online server with you as the sender, is known to you. If you do not configure an SPF record, outgoing emails will not be correctly delivered and they will be blocked.
Please note:
If you change the DNS of your domain name, it may lead to your website and email no longer being accessible. We recommend only to make changes yourself if you are experience in administrating the DNS. Contact your system administrator regarding this.
The principle of the explanation below is: yourdomain.nl.
You ask your system administrator or your web hosting partner to create or change an SPF record.
- Example of an existing SPF record
Example:
The SPF record looks as follows:
Domain name | Type | Record
yourdomain.nl txt v=spf1 mx ip4:213.76.258.8 include:spf.protection.outlook.com ~all - Example of the same SPF record with authorisation for AFAS
Example:
After the change, the SPF record will look as follows:
yourdomain.nl txt v=spf1 mx ip4:213.76.258.8 include:spf.protection.outlook.com include:spf.afas.online ~all
You therefore only need to add the following:
include:spf.afas.online
Have you added spf.afas.online to the SPF record of your own? Carry out the steps below to configure the outgoing mail server in Profit.
Below, you will see the instructions of the three largest hosting providers of the Netherlands:
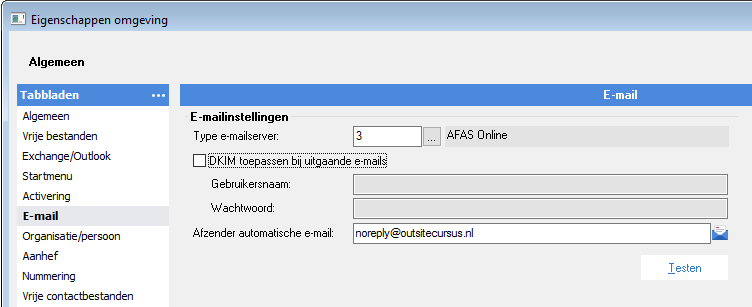
Step 2: Configuring the mail server in Profit:
- Go to: General / Environment / Management / Properties.
- Go to the tab: E-mail.
- Select AFAS Online in the Mail server type field.
You only need to Automatic e-mail sender enter.
- Enter that address in Automatic e-mail sender that will be specified in the automatically sent emails. Enter here a general email address of the organisation, for example, reply@enyoi.nl (use your own email address and not this example).
Tips:
- Also add another different sender email address for each administration. This will prevent error messages from being sent.
- You can, moreover, add a deviating sender email address through the message templates for each component in the order route than used for the E-mail and Output actions.
Configure your own mail server (incl. Gmail and Office 365)
This is the default procedure for configuring the outgoing mail server.
Configuring the mail server and recipient in the environment:
- Go to: General / Environment / Management / Properties.
- Go to the tab E-mail.
 Own mail server
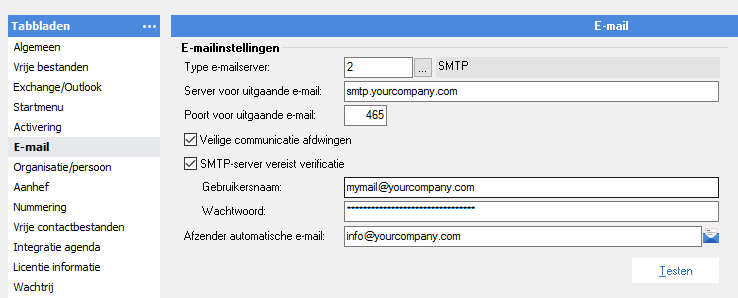


Tips:
- You can, if required, add another different sender email address for each administration.
- You can, moreover, add a deviating sender email address through the message templates for each component in the order route than used for the E-mail and Output actions.
Error message: MailKit.Net.Smtp.SmtpCommandException: 5.7.64 Relay Access Denied ATTR36.
Problem:
Emails from Profit are not being sent. Sometimes, the email with the invitation sent to employees for the Pocket App is sent, but invoices/reminders, etc. not.
Cause:
The required IP addresses are not specified in your own allow list.
Solution:
- See the IP addresses that are specified above
- See the overview of IP addresses, URLs and ciphers
Domain Key Identified Mail (DKIM) as an extra security tier for sending emails
If you use the mail server of AFAS Online, in addition to the SPF record, you have an additional option to secure your email flow: DKIM. This means that the emails that you send from Profit (on behalf of the mail server of AFAS Online), will be provided with a DKIM signature. This signature contains the sender (domain) of your organisation.
You can request this via the AFAS customer portal. Go through the steps below after which AFAS will send you a username and password. By entering the username and password in a Profit environment at the mail server, DKIM signature will be applied from this environment for the domain for which you request this.
Please note:
Who should you contact to make DKIM changes in the domain provider's control panel? AFAS Support cannot help you with this, but you can look it up at https://lookup.icann.org/en/lookup (there are other, similar websites).
You can enter the same username and password in several Profit environments to apply DKIM signature on behalf of that domain from several environments. This process consists of two steps, that is, the request through the customer portal and the definition of the settings in the Profit environment. You can read how to add an extra domain below, for example, when you are operational in a different country.
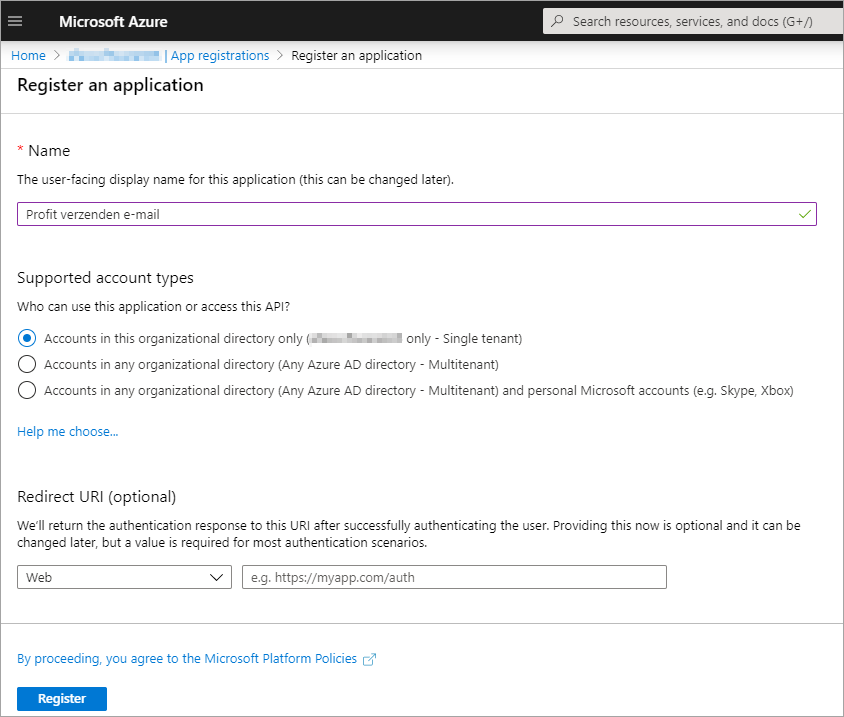
Step 1: Request via the customer portal
- Log on to the AFAS customer portal as the Administrator.
- On the customer portal, to Mijn gegevens / Abonnementen / Mijn abonnement.
- Click the subscription of your Profit environment.
If, for example, the Profit environment is called O98765AA, the subscription is 98765.
- Click: Create DKIM request.
- Enter the domain that you want to use in the DKIM domain field.
It is important that the correct domain name is entered in the DKIM domain field. Enter here the domain for which you want to use DKIM. The domain is part of the e-mail address.
Example:
Your email address is eva@voorbeelddomain.nl.
We only need the section that comes after @, therefore exampledomain.nl.
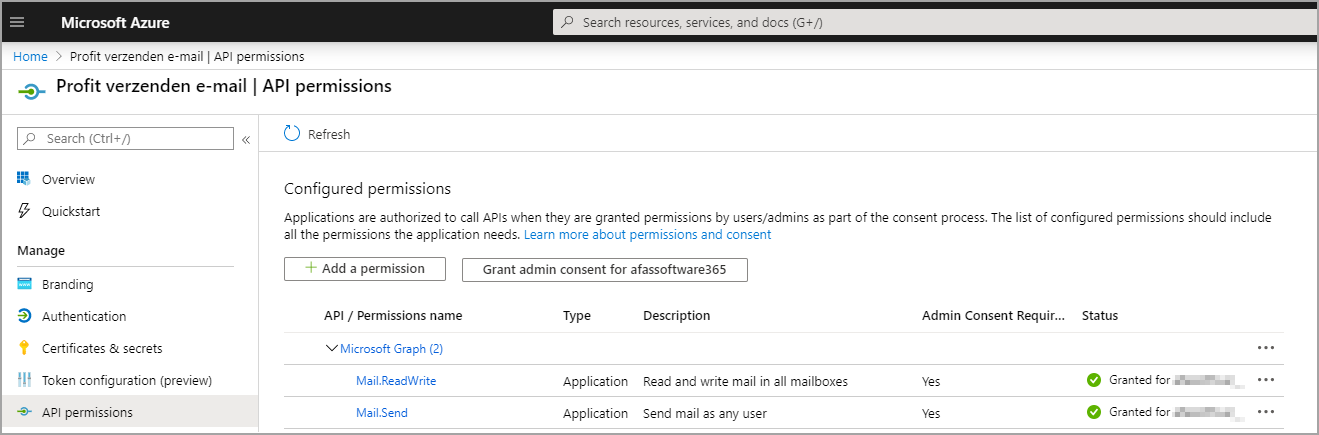
- First create two CNAME records in the DNS or your domain. This refers to the two records below where exampledomain.nl must be replaced with your domain.
- afasonline1._domainkey.exampledomain.nl must be created as CNAME with a reference to afasonline1.domainkey.afas.online.
- afasonline2._domainkey.exampledomain.nl must be created as CNAME with a reference to afasonline2.domainkey.afas.online.
AFAS recommends a TTL (Time to live) of 1 hour for both CNAME records. Your system administrator can create the CNAME records for you in the DNS.
It is allowed to already make the request with AFAS before the CNAME records are created. In this case, the request will be rejected with the option to have the request reassessed. It is also mandatory that you already have the AFAS Online SPF record configured before making this request.
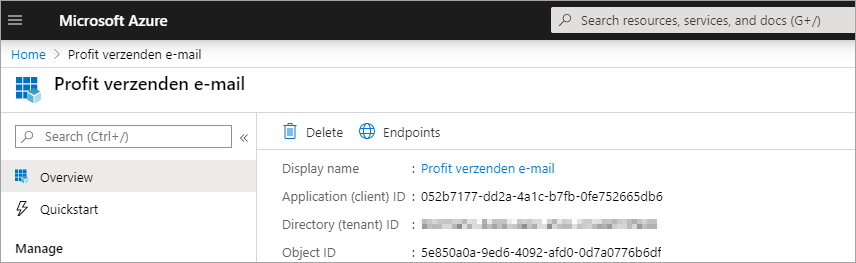
Step 2: Settings in the Profit environment
- You will receive a username and password through the request. Configure these as follows in Profit:
- Open the environment.
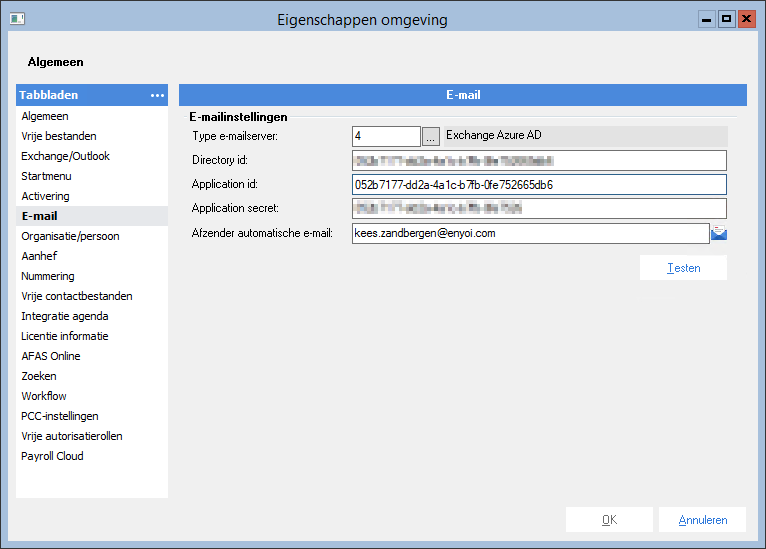
- Go to: General / Environment / Management / Properties.
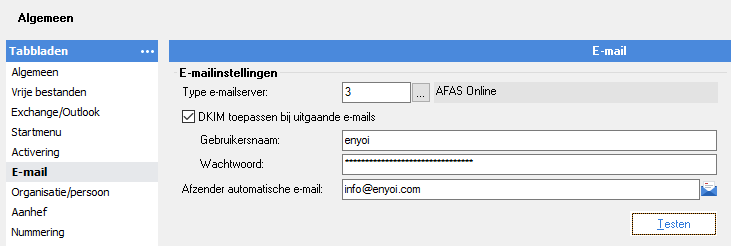
- Go to the tab E-mail.
- Select Apply DKIM in relation to outgoing emails and enter the email address and password.
- The figure below includes example data. Enter your own data.
After the configuration, your emails will be sent after applying DKIM encryption.
DKIM request for an extra domain
Image you once requested enyoi.nl and this domain works how you like it. You recently opened a site in Belgium and now want that the emails on behalf of enyoi.be are DKIM signed. In this case, you must restart the request and enter enyoi.be. The same checks are carried out. Only the steps in Settings in Profit are no longer necessary. AFAS will indicate that you already have a username and password in the request and that you do not again have to define them somewhere. When the request has been completed, the email messages that you send on behalf of enyoi.be will also be signed with DKIM.
Configure the checking policy for recipients on the sender's domain (DMARC)
You can use DMARC. In relation to DMARC, you can specify with a registration (DMARC record) on the domain from where you send emails how you want recipients to handle specific checks (such as DKIM and SPF) for emails that are sent (or seem to be sent) from your domain. This will help to limit spam or emails that are not really sent on behalf of your organisation.
Since DMARC is a setting on your domain, this is something that you can configure yourself as an organisation. This is not a setting that you need to request from AFAS and AFAS does not offer support with regard to this. Contact the administrator of your domain or mail servers. If you send your outgoing email through the AFAS mail server; read how you can configure SPF and DKIM above.
For more Information, please refer to
- https://www.dmarcanalyzer.com/nl/dmarc-2/
- https://www.sparkpost.com/resources/email-explained/dmarc-explained
SendGrid (sending large quantities of email)
SendGrid is a party who specialises in sending (large quantities) of emails. In addition, they offer all types of tools to analyse your email flow.
With SendGrid, it is recommended to choose a subscription type with a dedicated IP address. This is a more expensive subscription type, but it will prevent email from being sent through a shared IP address, which may mark your email as spam.
Please note:
AFAS does not offer support with regard to the configuration of SendGrid; contact SendGrid yourself with regard to this.
Configure SendGrid:
- Register on the signup.sendgrid.com page.
- Create an SMTP Relay by using the next page.
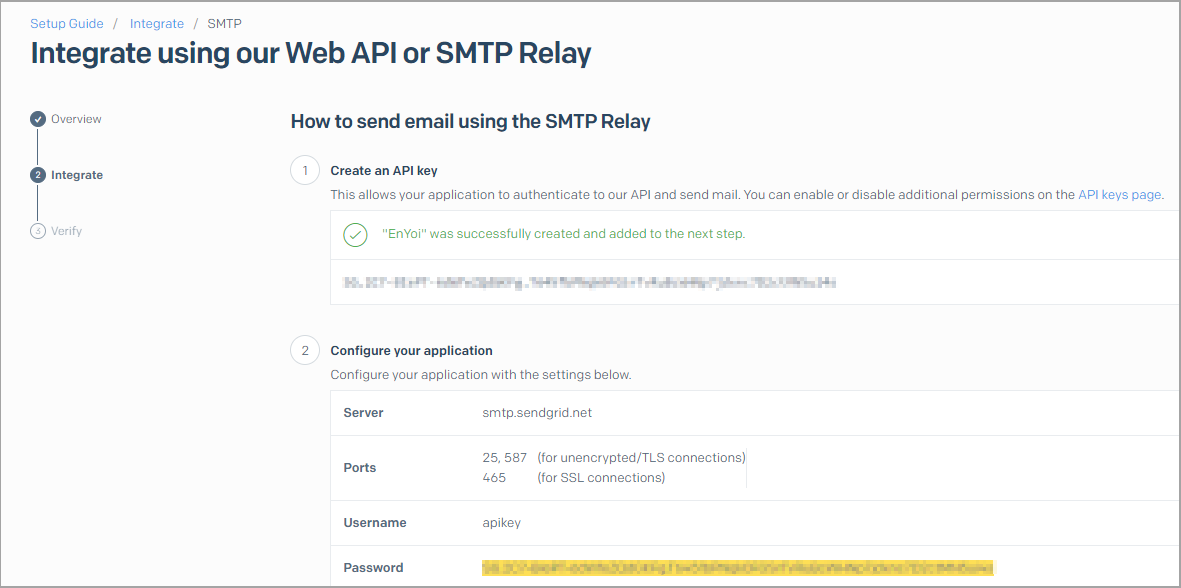
- Copy the created API key and keep it on your PC. You need it for the configurations in Profit.
- Leave the SendGrid page open.
Configure Profit:
- Open the environment.
- Go to: General / Environment / Management / Properties.
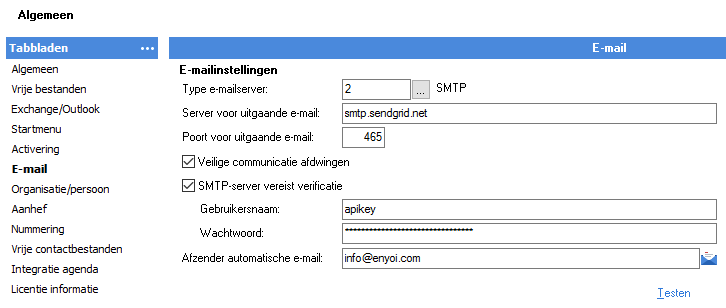
- Go to the tab E-mail.
- Select SMTP in the Mail server type field.
- Server for outgoing mail: smtp.sendgrid.net
- Port for outgoing mail: 465
- Select Enforce secure communication and SMTP server requires verification.
- Username: apikey
- Password: the previously copied API key.
- Go to the SendGrid page and click Verify integration.
- Go to Profit and send an email with the Test button.
The recipients of email that you send through SendGrid will see ‘via sendgrid.net’ in the received email.
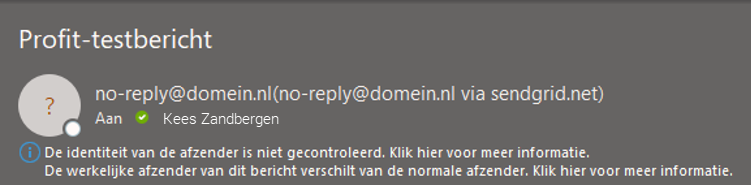
If you do not want this, apply ‘domain authentication’ in the configuration within your DNS and SendGrid. The message will disappear from emails that are subsequently sent. This will have a positive impact on your reputation as a sending party.