

Add a payment order
When adding a payment order, you select the outstanding items to be paid.
Note:
- You may have multiple payment orders that are to be processed simultaneously, if each invoice has been included in one single payment order. You do not need to first process a payment order before adding a new order. If an invoice is present in several payment orders, then only the invoice in the first order is paid.
- Each payment to a creditor contains data from the invoice (or invoices) that you are paying. The invoice numbers are then listed on the creditor's bank statement. You send the factuurnummer in the payment file if you HAVE NOT selected the Copy entry description check box on the Payments tab of the administration settings for the administration in question. In the payment order, you select Only invoice number(s) statement or State fixed description and invoice number(s) in Order information.
- You can specify that instead of the invoice numbers, you want to send the Omschrijving van de boeking. The description of the entry is taken if you HAVE selected the Copy entry description check box on the Payments tab of the administration settings. In the payment order, you select Only invoice number(s) statement in Order information.
|
Contents |
Add a payment order
To add a payment order:
- Go to: Financial / Creditor / Payment order.
- Click on: New.
- Select the bank account number you want to use to pay the creditors.
The file location and file format for saving the payment file have been set up in the properties of this bank account (via General / Configuration / Payment settings / Bank account, Payment tab). If this tab has not been completed for this bank account number then you cannot create a SEPA file.
- Select the invoices.
The Reference date is the most important item here. Only due invoices are automatically included, these are the invoices that are due on the reference date.
Example:
Use 31-07-2015 as the reference date. Invoices with a due date before the reference date (for example 30-07-2015) are included while invoices with a later due date (for example 01-08-2015) are not.
If you select 'Also include the not yet due invoices of the Creditor' check box then Profit will include all the non-due invoices. However, you need to select the check boxes for these non-due invoices manually on the Invoices tab in the payment order properties before you process the payment order. Only then are these invoices actually included in the payment file.
- Select the desired processing date in Preferred processing date. This processing date cannot be more than 30 days in the future.
You add the payment order and send it to the bank. The bank processes the payment order on the date you specify. Not all banks support a specific processing date, so please check with the bank.
The outstanding items are only written off on this Preferred processing date. The voucher date of the financial entry that originates from the payment/collection order is the same as the Preferred processing date and not the system date (the creation date of the payment order itself). In the Voucher field on the Entries tab for the creditor you see the preferred processing date of the payment order.
- Specify what information you want to send per payment line in Order information.
If you select the value Only fixed description statement or State fixed description and invoice number(s), enter a description that applies to all items in the payment file.
Select the Only invoice number(s) statement check box if you want Profit to include the description of the entry.
In this course, you select Only invoice number(s) statement so that Profit only includes the description of the entry.
Profit also looks at the settings: if the 'Copy entry description' check box has been selected, Profit takes the entry description, and if it is NOT selected, Profit takes the invoice numbers.
Note:
You send along the description according to the setting in this field. If you use a fixed description in the payment order and a Payment reference was included when the invoice was entered, this fixed description is sent with the SEPA file, but the payment reference in the invoice is not included in the description. If you do want the Payment reference of the purchase invoice to be included, select Only invoice number(s) statement instead of Only fixed description statement.
It can happen that not all entry descriptions or invoice numbers can be written for creditors for whom you have compressed the payments. This is because there are a maximum of 128 positions available for the descriptions. Furthermore, if a fixed description is also written then there are only 96 positions available for the invoice numbers. You can resolve this by DEselecting the Compress check box on the Payment tab. (Note: The consequence of deselecting the Compress check box is that Profit no longer settles a credit note with an invoice from this creditor.)
- Enter a description in Fixed description if you have selected the value Only fixed description statement or State fixed description and invoice number(s) in the previous field for Order information. This description applies to all items in the payment file.
- The upper and lower limit for creditors is intended for selecting certain creditors, for example, all creditors that begin with 3.
- In Payment method, select the payment method.
The bank account number and the creditors must be suitable for the payment method. For example, if you perform SEPA payments, you must set up the bank account number for the generation of a SEPA payment file.
- If applicable, select a currency code; this depends on the selected payment method.
- Click on: Next.
- Deselect the invoices you do not want to pay.
In this wizard, you select only the invoices of the creditors you want to pay.
You can also select/make payable individual invoices for a creditor using the Invoices tab in the payment order properties after you have completed the payment order wizard.
Note:
In the Balance column of this view of selectable creditors, the total outstanding balance of the creditors is shown. This does not mean that this total balance will be included in the payment order and therefore be made payable.
- Click on: Finish.
Note:
If you are using the queue, Profit places this task in the queue. While the task is being performed in the queue, you can continue to work. See: Use and manage the queue
The queue is always enabled in AFAS Online. That means that the task is always preformed via the queue.
After adding invoices, the status of the payment order is Not processed. In the properties of the bank account number, you can specify that the wizard for processing (generating) the payment file is launched automatically after the addition of the payment order.
Include invoices that are not due
If you select the For creditor with expired invoices, also include non-expired invoices check box, you do not automatically include all of the outstanding invoices. Only outstanding invoices from a creditor that has at least one invoice that is due on the specified reference date are included.
For creditor with expired invoices, also include non-expired invoices
Example:
Creditor X has two outstanding invoices: one with a due date of 15 August and one with a due date of 30 November. You add a payment order with 27 October as the reference date. This means that the invoice with the due date of 15 August is due and the invoice with a due date of 30 November is not yet due. If, when you add the payment order, the For creditor with expired invoices, also include non-expired invoices check box is selected then both invoices are paid (not only the invoice that is due, but also the outstanding invoice).
Creditor X has two outstanding invoices: one with a due date of 30 October and one with a due date of 30 November. You add a payment order with 27 October as the reference date. This means that neither invoice is due. If you select the For creditor with expired invoices, also include non-expired invoices check box, all these invoices are also included.
Make an invoice that is not due payable
The invoices that are not due and that you add to the payment orders are not automatically made payable. You must first make these invoices payable manually:
- Go to: Financial / Creditor / Payment order.
- Open the properties of the payment order.
- Go to the tab: Invoices.
- Select the Pay check box for invoices that are not yet due but you which you want to pay anyway.
The status of the invoice then becomes Approved for payment.
- Click on: OK.
Multiple payment orders
You can add multiple payment orders in Profit at the same time and process them on different dates. For example, you may want to process some payment orders during the holidays.
Example:
You want to pay the creditors on 25 July and on 8 August. You are on holiday in this period and you create the payment orders before your holiday.
You can create these payment orders separately and process them one by one. When creating a payment order, you can use the reference date to retrieve the invoices that are due on that reference date. So for the first payment order you can enter 25 July as the reference date and for the second payment order you can enter 8 August as the reference date. You can also include a preferred processing date. Thus for one payment order you enter 25 July as the preferred processing date and for another you enter 8 August. The bank software package will check this preferred processing date. This means you can also read the payment orders into the bank software package in advance. The reference date and the preferred processing date can be identical.
Note! The preferred processing date can never be more than 30 days in the future.
Payments to 'G'-accounts
You can make automatic payments to the 'G'-account of the creditor if you are using the 'Wet Ketenaansprakelijkheid' provisions. You need to activate this option separately.
Automatic payments to the 'G'-account:
- Go to: Financial / Creditor / Creditor.
- Open the properties of the creditor.
- Go to the tab: Payment.
- In the 'G'-account field, enter the account number into which you are paying.
- While entering the purchase entry complete the amount for the 'G'-account.
- When adding a payment order, complete the Which part of the invoice field.
In this field you specify whether you only want to make payments to 'G'-accounts, only normal payments or all payments.
Payment reference greater than 16 positions
When adding a payment order you can include the entry description as the payment reference, instead of the original invoice number of the creditor (also known as 'Creditor invoice No.' or 'Voucher Number'), if you want more than 16 positions for the payment reference. The original creditor invoice number contains no more than 16 positions. If you need more positions, the entry description has the advantage that it is longer.
To use a payment reference with more than 16 positions:
- You can set this up by selecting the Copy entry description check box on the Payments tab of the administration settings.
- When entering the purchase invoice, you then record the payment reference in the Description entry of the purchase invoice. For example: 'Payment reference - description', so that not only the payment reference is included, but also another description, if required.
If you are using scanning software for recording purchase invoices in Profit, while scanning you can save the payment reference in the Description entry field automatically.
If you set this up, Profit only includes the entry description with all automatic payments. With this method, it is therefore necessary that you always record the payment reference correctly in the Description entry.
Payment method of payment order
When adding a payment order, you can select the Payment method. Based on this choice, you only select those creditors for whom this payment method is set. By doing so, you can make a payment in SEPA in the base currency or per foreign currency (for example Dollars). For a payment in foreign currency, you can generate a payment file in BTL91 format.
This Payment method that you select for the payment order must match the Payment method you have set in the properties of the creditor.
To use a payment method in a payment order:
- Go to: Financial / Creditor / Creditor.
- Set the Payment method on the Payment tab of the properties of the creditor(s) in question
In Payment method, select Payments in basic currency if you want to make the payment in the basic currency (euros).
Select Payments in foreign currency or International payments and all payments in foreign currency if you want to make the payment in a foreign currency (for example in dollars). In this case, you must have configured the currency.
- Go to: Financial / Creditor / Payment order.
- Click on: New.
- Complete the fields. for the Payment Order.
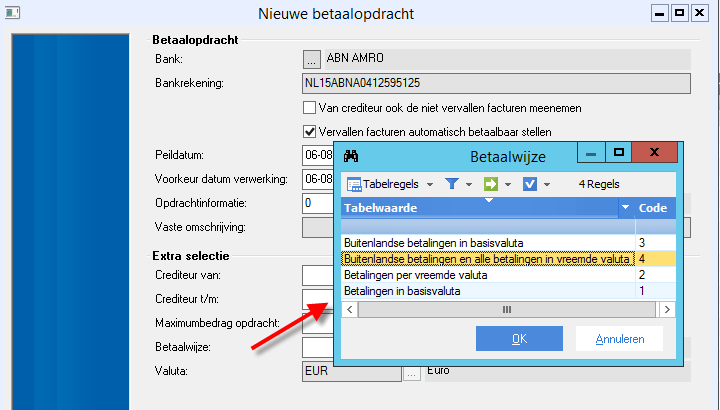
- In Payment method, select the payment method of the specific creditors you want to pay.
Select Payments in basic currency (1) if you want to include the payments in euros in the SEPA file.
Select International payments in basic currency (3) if you want to include the payments in euros of creditors outside of the Eurozone in the BTL91 file.
Select International payments and all payments in foreign currency (4) if you want to make the payment in a foreign currency (for example, dollars) and want to include all foreign currencies (using this payment method, you cannot select a specific currency). Select Payments in foreign currency (2) if you want to select a specific foreign currency.
The payment method you select here must match the payment method you have set for the creditors in question. The outstanding invoices of these creditors are included in the payment order.
- If applicable, select a currency code in Currency; this depends on the selected payment method.
- In Payment method, select the payment method of the specific creditors you want to pay.
- Click on: Next.
- Click on: Finish.