

Configure the project settings for hours and checks
You can use the time registration as the basis for the actual costing. In Profit Projecten, you can set up the time registration in a way that completely meets the requirements of your organisation. This makes it possible to also use the time registration if your organisation does not work on the basis of projects, but still wants to register hours. Usually you record hours per employee, but you can also register hours, for example, per organisational unit (department) or per job.
The actual costing can consist of work type lines, article lines and cost lines. In that case, you use the actual costing for the time registration, but in addition to these work type lines you can also create article and cost lines.
- The work type lines always have the ‘Per hour’ unit. When entering hours, you use work types to designate the nature of the activities performed. Examples of work types that require a physical action: Carpentry, Administrative work, Report writing.
- In the cost lines, you register kilometres driven or other costs that you can enter as a unit (reports, drawings, copies, lunches, etc.). You register these as 'Costs' (instead of 'Work type').
When entering the hours, you can perform a check for completeness by specifying a minimum number of hours that must be entered per day. You can also perform a check on the maximum and the 'normal' number of hours, where you can distinguish between normal worked hours and extra worked hours using the hour type.
You can further extend these checks using so-called validity combinations. Using validity combinations, you can perform a check on the validity of the combination of data in the hour entries. For example, per employee you can specify on which projects he is allowed to enter hours and which work types are allowed for a specific project.
You can define up to three calculation bases as the basis for the validity combinations. This allows you to, for example record the validity combinations for combinations of employee, of project or project group and of work type or work type group. In addition, because of the date-dependency of the validity combinations, you can specify that a combination is only valid as of a certain date, after a certain date or during a certain period.
When entering the hours the various search screens only display the data that is allowed according to the validity combinations. This prevents employees from posting entries to wrong projects or using wrong work types.
You can use the time registration for central recording (the administration enters the hours for all employees, based on the hour lists) and for decentralised recording (the employees enter their own hours). By adding employees that are allowed to enter hours as a user in Profit as well, you can create a link between the user logging in to Profit and the employee entering hours.
Note:
In the period table for Profit Projecten, you can block a closed period. This prevents employees from entering actual costing in a closed period. When entering the actual costing per line / per week / per period or by using ProfitWeb, Profit checks if you enter the hours in a blocked period. This check is also performed when you import the actual costing lines.
To configure the entering of hours:
- Go to: Projects / Management / Settings / Project.
- Go to the tab: Hours.
- Select the Book chronologically check box if you want to perform a check of the minimum number of hours per day when entering hours.
In that case, the employees must enter their hours consecutively and can only enter hours for a next date if the minimum for the previous day has been fully booked or exceeded. If you select this check box, part-timers will also have to enter hours on the days that they do not work. This is because it is mandatory to enter a minimum number of hours.
- Go to the Monday to Sunday fields and select the check boxes for the days on which you want to be able to enter hours. If you do not select the check box for a day, you cannot enter hours for this day.
- Select the Proposals check box if you want Profit to suggest the number of hours. You can only activate this field for a day that you have selected.
Note:
Selecting the check boxes for days and the Proposals field applies to all employees. If a part-time employee works on Mondays, Wednesdays and Fridays, Tuesday is also suggested for entering hours if both the Tuesday and Proposals (after Tuesday) check boxes are selected.
- In Minimum, enter the minimum number of hours that employees must enter on this day.
- In Maximum, enter the maximum number of hours that employees are allowed to enter on this day. Normal is the normal number of hours that is entered on this day.
- In Normal hour type, select the hour type that Profit has to propose if the normal number of hours for a day has not yet been fully entered. This field is not mandatory.
- In Extra hour type, select the hour type that has to be proposed if the normal number of hours for this day has been fully entered.
- Select the Approve immediately check box if you want all posted lines in the actual costing to be considered as approved immediately. This means that hours entered can no longer be changed, unless the approval is cancelled.
- Select the Close immediately check box if you want all lines entered in the actual costing to be reported ready immediately. This means that hours entered can no longer be changed, unless the reported ready status is cancelled.
- Go to the tab: Check.
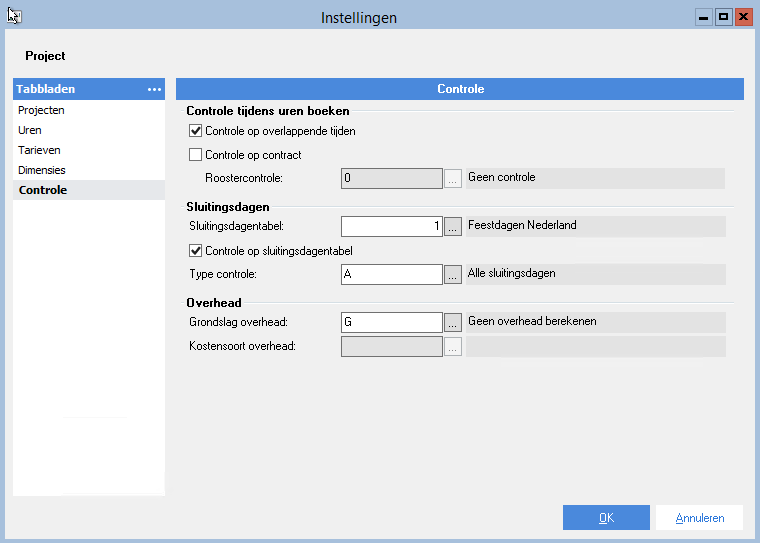
- Select the Check for overlapping times check box if you want to check this when you enter actual costing/hours.
If you have set this check and have posted overlapping entries, Profit displays a message notifying you that actual costing has already been entered for this employee between the start and end time.
- (Only if Profit HR is part of your licence.) Select the Contract check check box if you want to check if a contract is present on the relevant date for the employee. If no contract is present, entering hours on that date is not allowed.
- Select a value for Timetable control if you want to use a check on the timetable in the actual costing. In that case, Profit checks if the number of hours equals the number of hours expected.
You can select from the following values:
- No check
- Closing entry
- Allow excess
Note:
Timetable checking works for Actual costing per line and Actual costing per week.
You can only adjust the value in this field if you also use Profit HR. If you work with Actual costing per week, you need to activate Check (shift) timetable when closing in the entry layout.
- Select the Check on days closed table check box if you want to check this when you enter actual costing/hours.
If you have set this check, an employee is not allowed to post entries on the days in the days closed table.
In the entry layout for Actual costing per line or Actual costing per week, you can use the Days closed check field on the General settings tab to specify that Profit should display a message if a user enters hours on a day closed. You use this field to specify whether the user is allowed to enter the hours after this message is triggered or not.
- Select a days closed table in Days closed table if you have selected the Check on days closed table check box.
In the days closed table, you record the days closed, which can be public holidays or not.
- Select a value for Check type.
You use this to determine whether Profit should check the following in the actual costing:
- All days closed. You cannot enter any hours on any of the days appearing in the days closed table. This is the most common situation.
- Public holidays only. This applies if the organisation enters leave on the public holidays. You can do this, for instance, by means of a collective leave entry. The leave flows into the actual costing from HR. In this case, the employee is not permitted to make an entry in the actual costing on a public holiday. On days closed that are not public holidays, an employee can in fact make entries.
- Days closed, excl. public holidays. For organisations that work on public holidays. One example of this would be the hotel and catering industry. Often, there are also other days on which the company is closed. These can be included as days closed without the ‘public holiday’ feature.
- Select the Overhead calculation basis, if you want to calculate overhead costs. By default this field is set to No overhead calculation.
Overhead costs are the general operating costs. You can settle them in the projects to get a better idea of your total costs. You can enter a percentage of the overhead costs to be used for the coverage of the general costs. This provides you with insight into the coverage of the general costs. If you want to calculate overhead costs, you set the calculation basis for entering the overhead costs:
- Select Actual costing of cost price as the calculation basis if one actual costing line per project per period must be created when you enter the actual costing per line .
- Select Invoice revenue as the calculation basis if creating a project invoice results in project revenue and one actual costing line per project per period must be created for the overhead costs.
- In Cost type overhead, select the cost type the overhead costs should be posted to if overhead should be calculated.
If you select a cost type here, then a separate actual costing line of a separate type is generated from the overhead. You cannot change this actual costing line and you cannot invoice it to the customer. You can however have this line included in the cost price. You can only select a cost type that is not in hours and for which the Charge check box is deselected.
From the financial entry program, a project entry can be created. The extra line for the overhead is created here too, if that has been set up.
- Click on: OK.
- Click on: Yes when you are asked if you want to reopen the environment.